
Shurikly 1.0.0 — Product Documentation
The open-source API client that reads your code.
| Product | Shurikly |
| Version | 1.0.0 |
| Launch date | 25 October 2026 |
| License | MIT (open source) |
| Platforms | macOS 12+ (Apple silicon & Intel), Windows 10 / 11 (x64), Linux (AppImage) |
| App ID | com.shurikly.app |
| Document status | Pre-launch — final for the 1.0.0 release |
Launching 25 October 2026. Installers for macOS, Windows and Linux and the public GitHub repository go live on launch day. Until then, download links on the website show Coming soon.
Overview
Shurikly is a free, open-source desktop application for designing, sending, testing, mocking and documenting HTTP APIs. It is local-first: there is no account, no cloud sync and no telemetry. Collections, environments, history and settings are plain JSON files on your own disk.
What sets Shurikly apart is that it starts from your code. The Code Scanner reads a project folder and builds a ready-to-send collection from your backend routes and frontend calls. The AI Engineer analyzes that collection, generates tests and explains failures. The Mock Server turns the same collection into a local fake API, and a built-in MCP server lets AI agents such as Claude and Cursor work with your live workspace.
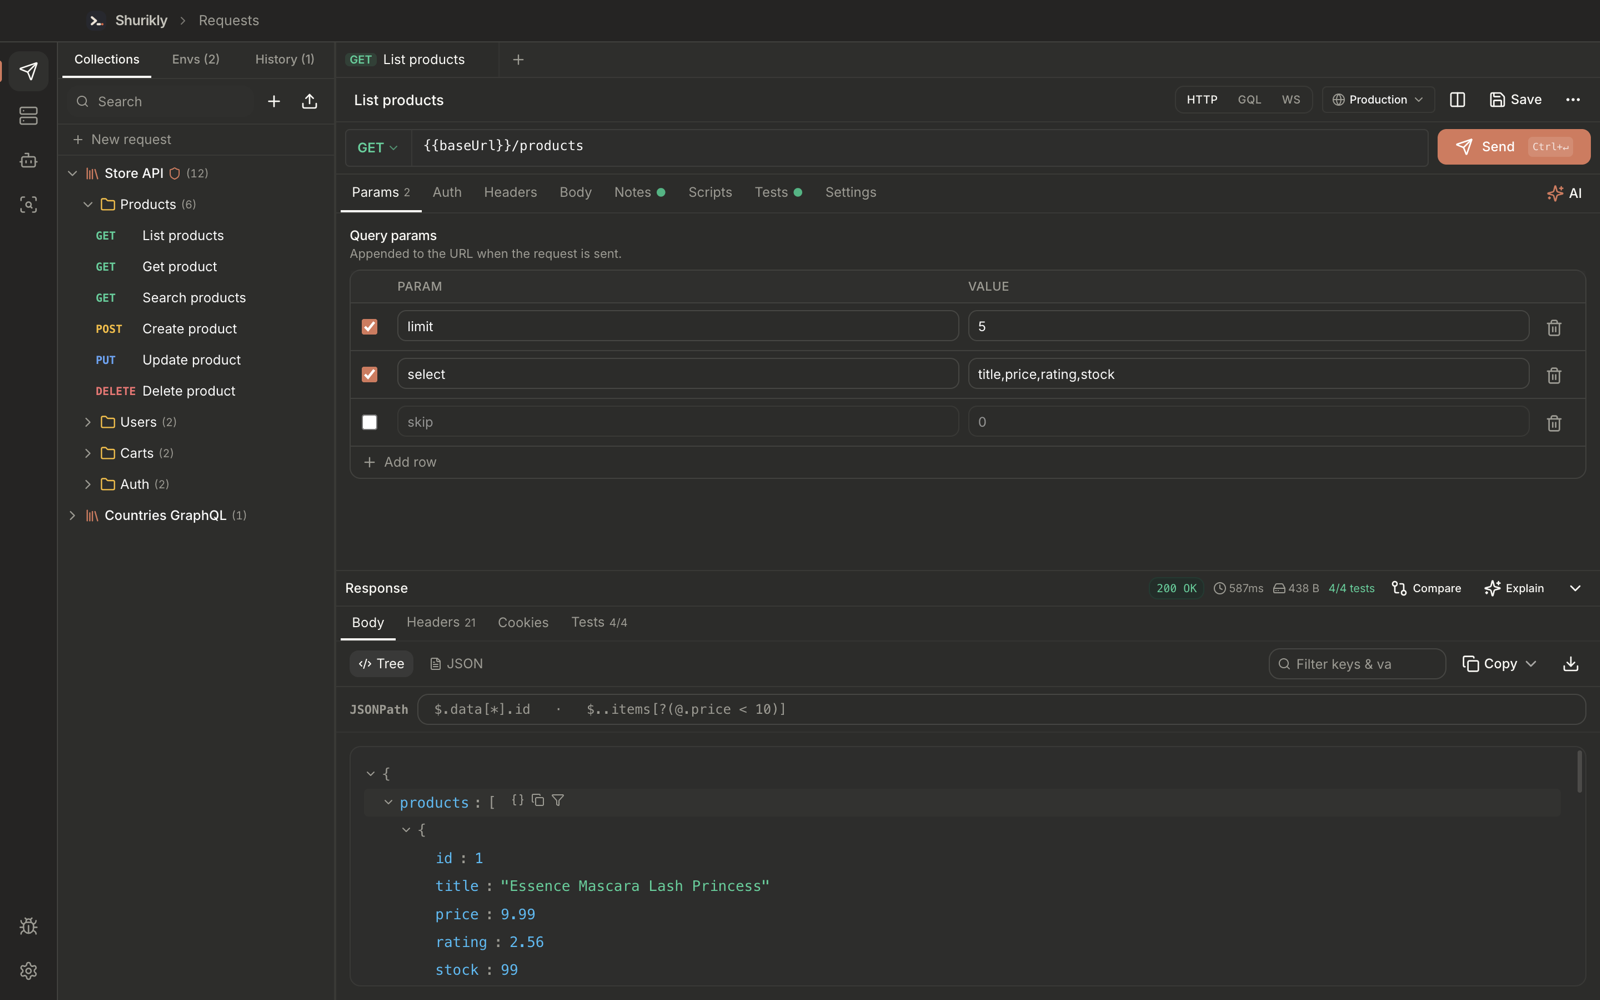 The request editor: method and URL, request tabs, and a 200 OK response in the JSON tree view.
The problem
- Most API clients require an account and store your requests — often including tokens and internal URLs — on a vendor's cloud.
- Collections drift from the code. Developers retype routes by hand, and the collection is out of date the day after it is written.
- AI features are usually locked to one vendor, cost extra, and send your data by default.
- Mocking an API for frontend work often means a separate tool or a hosted service.
The Shurikly answer
| Principle | What it means in practice |
|---|---|
| Local-first | All data lives in JSON files in your app data folder. Requests go directly from your machine to the target server. |
| Open source | MIT license. Read, fork, audit and redistribute freely. |
| Code-aware | Collections generated from source code and OpenAPI files, and re-scanned without losing your edits. |
| Your AI, your choice | OpenAI, Anthropic, Gemini, any OpenAI-compatible endpoint, or fully local Ollama. AI never sees API data unless you allow it. |
| One tool | Client, tests, runner, mock server, docs export and agent integration in a single desktop app. |
Who it is for
- Backend developers who want a collection that matches their routes without retyping them.
- Frontend developers who need a mock API while the backend is still in progress.
- QA and test engineers who want generated test suites with evidence for every failure.
- Teams with strict data rules that cannot put API credentials in a third-party cloud.
- AI-assisted developers who want Claude, Cursor or another agent to call and edit their APIs.
Feature summary
| Area | Highlights |
|---|---|
| Requests | REST, GraphQL and WebSocket; params, headers, JSON / form / raw / binary bodies |
| Authentication | Inherit, None, API key, Bearer, JWT, Basic, Digest, OAuth 1.0, OAuth 2.0 (authorization code, client credentials, password), AWS Signature, Hawk |
| GraphQL | Schema introspection, schema-aware autocomplete and validation, operation selection, data / errors view |
| Response inspection | JSON tree with filter, JSONPath, copy path / value, find-in-body, save to file, media previews, hex view, large-response guards |
| Compare | Diff status, headers, JSON paths, text, time and size vs. previous run, pinned baseline or another tab |
| Organization | Collections, folders, inherited auth / headers / settings, tabs, history |
| Environments | {{variables}} with per-environment values and an active environment |
| Scripts & tests | Pre-request scripts, assertions, collection runner with reports |
| Import / export | Import Postman, OpenAPI and cURL; export Postman, OpenAPI, cURL, Markdown / HTML docs; code snippets for cURL, JavaScript, Node.js, Python |
| Code Scanner | Collections from Express, Fastify, NestJS, Next.js, FastAPI, Flask, Django / DRF, OpenAPI files and frontend HTTP calls |
| AI | Generate requests from plain English, explain responses, write tests, fix failing requests, document collections |
| AI Engineer | API analysis, baseline and AI tests, safe execution, evidence-backed failure analysis |
| Mock Server | Local mock APIs, multiple responses per route, templates, CORS, request log |
| MCP | Local Model Context Protocol server with 28 tools for AI agents |
| Diagnostics | Searchable logs and local bug reports with credential redaction |
Screen tour
Every screenshot in this document was taken from the Shurikly 1.0.0 desktop app on macOS in the default dark theme, using a sample Store API collection (backed by the public DummyJSON API) and a public GraphQL endpoint.
| Screen | Where to find it | Section |
|---|---|---|
| Request editor | Left rail → Requests | Requests |
| Environments | Sidebar → Envs, or the environment menu | Environments and variables |
| Tests and Collection Runner | Request → Tests; collection menu → Run collection | Scripts, tests and the collection runner |
| Compare | Response bar → Compare | Compare |
| Code Scanner | Left rail → Code Scanner | Code Scanner |
| AI Engineer | Left rail → AI Engineer | AI Engineer |
| Mock Servers | Left rail → Mock Servers | Mock Server |
| Settings | Left rail → gear icon | Settings |
Getting started
Install on macOS
- From 25 October 2026, download the disk image for your Mac from the website or GitHub Releases:
- Apple silicon (M1 and later):
Shurikly-1.0.0-arm64.dmg - Intel:
Shurikly-1.0.0.dmg
- Apple silicon (M1 and later):
- Open the
.dmgand drag Shurikly into Applications. - The 1.0.0 build is not yet notarized by Apple. On first launch, right-click Shurikly in Applications and choose Open, then confirm. Later launches open normally.
Not sure which Mac you have? Apple menu → About This Mac. "Chip: Apple M…" means Apple silicon; "Processor: Intel…" means Intel.
Install on Windows
- From 25 October 2026, download
Shurikly Setup 1.0.0.exefrom the website. - Run the installer. You can choose the installation folder; Start menu and desktop shortcuts are created.
- If Microsoft Defender SmartScreen shows a warning for the unsigned installer, choose More info → Run anyway.
Install on Linux
The AppImage is available from 25 October 2026.
chmod +x Shurikly-1.0.0.AppImage
./Shurikly-1.0.0.AppImage
First launch
On first launch Shurikly shows a three-step setup flow. Every choice can be changed later in Settings.
- Welcome — what the app does: HTTP, GraphQL and WebSocket, collections and folders, environments, every common auth type, scripts / tests / runner, and built-in AI.
- Local-first — no account and no telemetry, your data stays on this machine, requests go directly to the servers you call, and AI is used only when you ask.
- Terms and get started — accept the terms, then send a sample request, import an existing collection, or connect an AI provider.
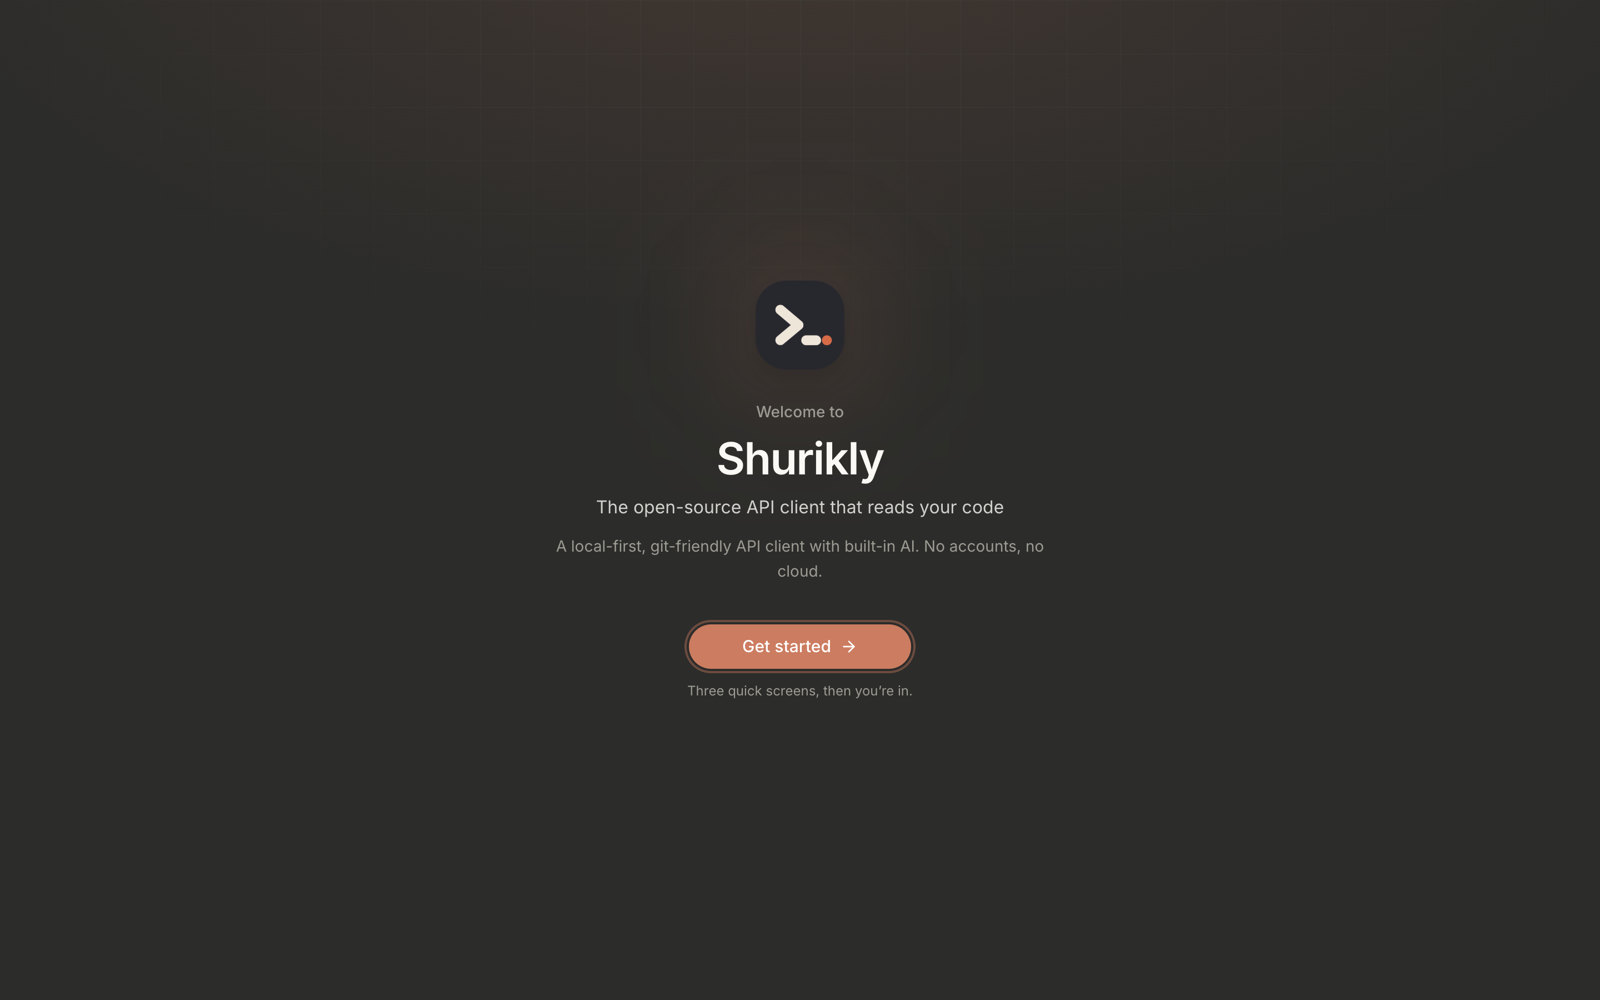 Step 1 — the welcome screen.
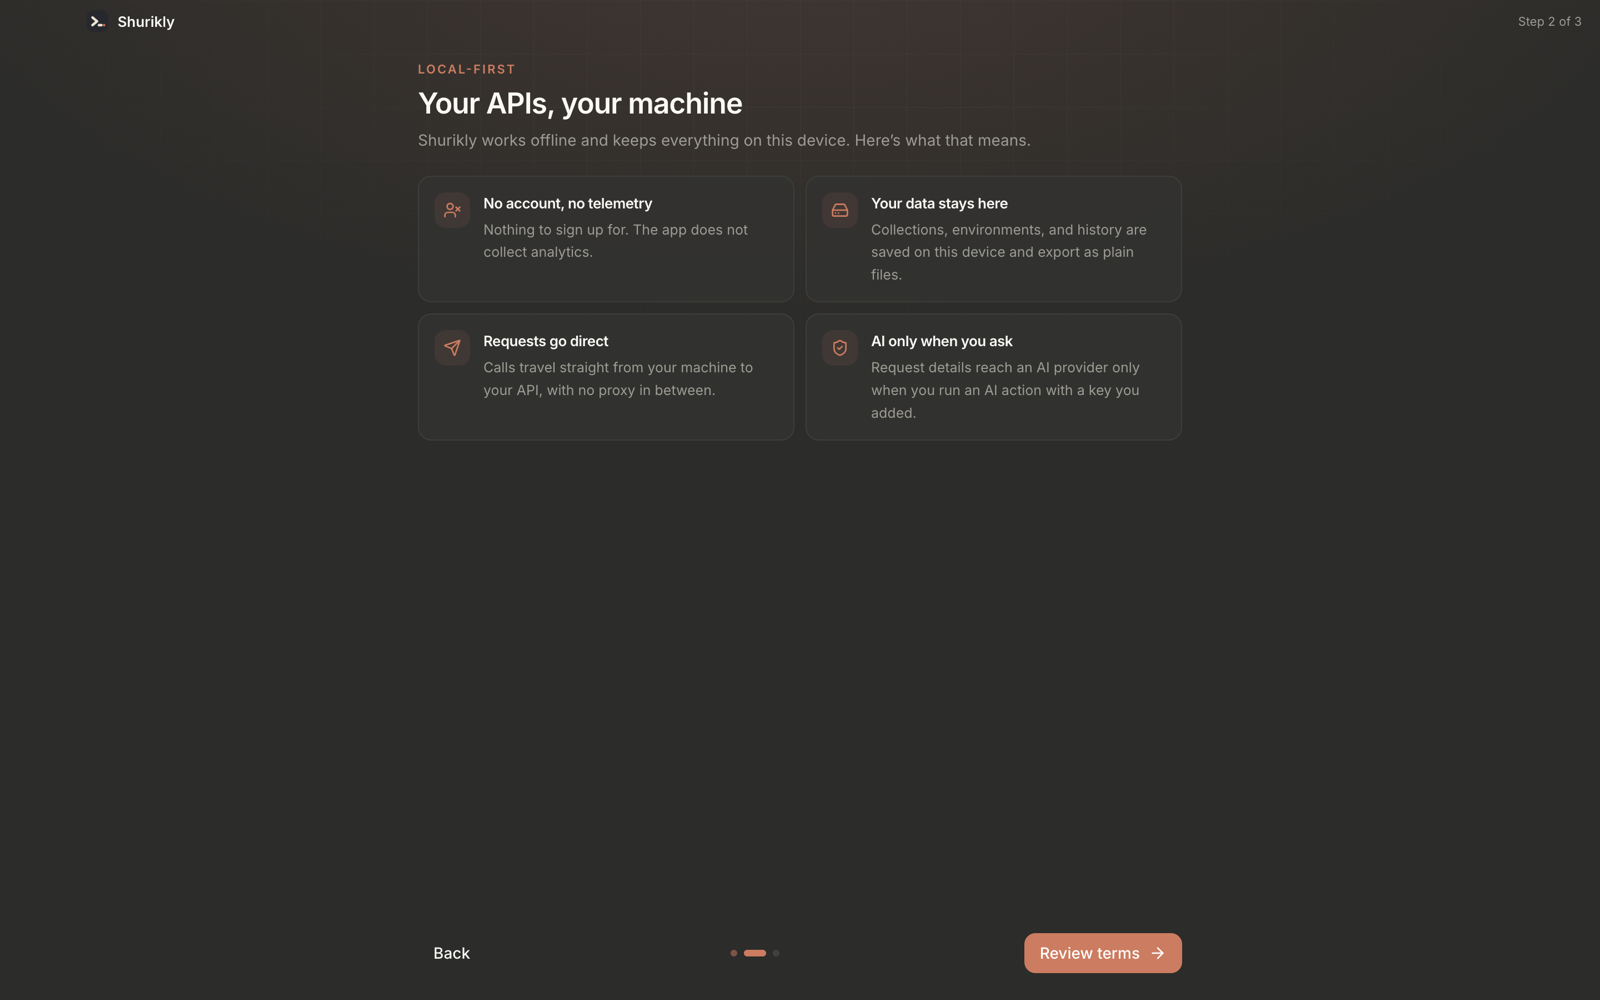 Step 2 — what local-first means for your data.
The main window
The Requests workspace: collection tree on the left, open request tabs across the top, the request editor in the middle and the response below.
| Area | What it does |
|---|---|
| Left rail | Switch between Requests, Mock Servers, AI Engineer and Code Scanner. Bug reports and Settings sit at the bottom. |
| Sidebar | Collections, Envs and History tabs. Search, create (+) and import (upload icon) at the top. |
| Tab bar | One tab per open request, with its method badge. + opens a blank request. |
| Request bar | Breadcrumb (collection › request), protocol switch (HTTP / GQL / WS), active environment, split-view toggle, Save and more actions. |
| URL row | Method picker, URL with {{variables}}, and Send (Ctrl+Enter). |
| Request tabs | Params, Auth, Headers, Body, Notes, Scripts, Tests, Settings. A dot or count shows which tabs hold data. The AI button opens AI actions. |
| Response panel | Status, time, size and test summary, plus Compare, Explain and the Body / Headers / Cookies / Tests views. |
Your first request
- In Requests, click New request in the sidebar (or
+in the tab bar). - Choose a method and enter a URL — for example
https://dummyjson.com/products?limit=5. Query parameters typed in the URL appear in the Params table, and edits in the table update the URL. - Press Send or
Ctrl+Enter. The response panel shows the status (for example200 OK), time, size and the body as a JSON tree. - Click Save to put the request into a collection. It then appears in the sidebar, and every send is recorded in History.
Requests
Protocols
- HTTP / REST — any method (GET, POST, PUT, PATCH, DELETE, HEAD, OPTIONS and custom).
- GraphQL — endpoint, query, variables, headers and auth, with schema tooling (see below).
- WebSocket — connect, send messages and watch the message stream.
Request builder
- Params — Path variables fill
:idor{id}tokens in the URL; Query params are key / value rows kept in sync with the URL. Untick a row to disable it without deleting it. - Headers — key / value pairs with enable / disable toggles and descriptions. Headers inherited from a folder or collection are merged in at send time.
- Body — None, JSON (editor with formatting and linting), Text, Form Data (text and file fields) and URL Encoded. Fill with AI drafts a body from the endpoint.
- Notes — Markdown notes attached to the request.
- Scripts and Tests — see Scripts, tests and the collection runner.
- Settings — per-request options such as the timeout (30 s by default).
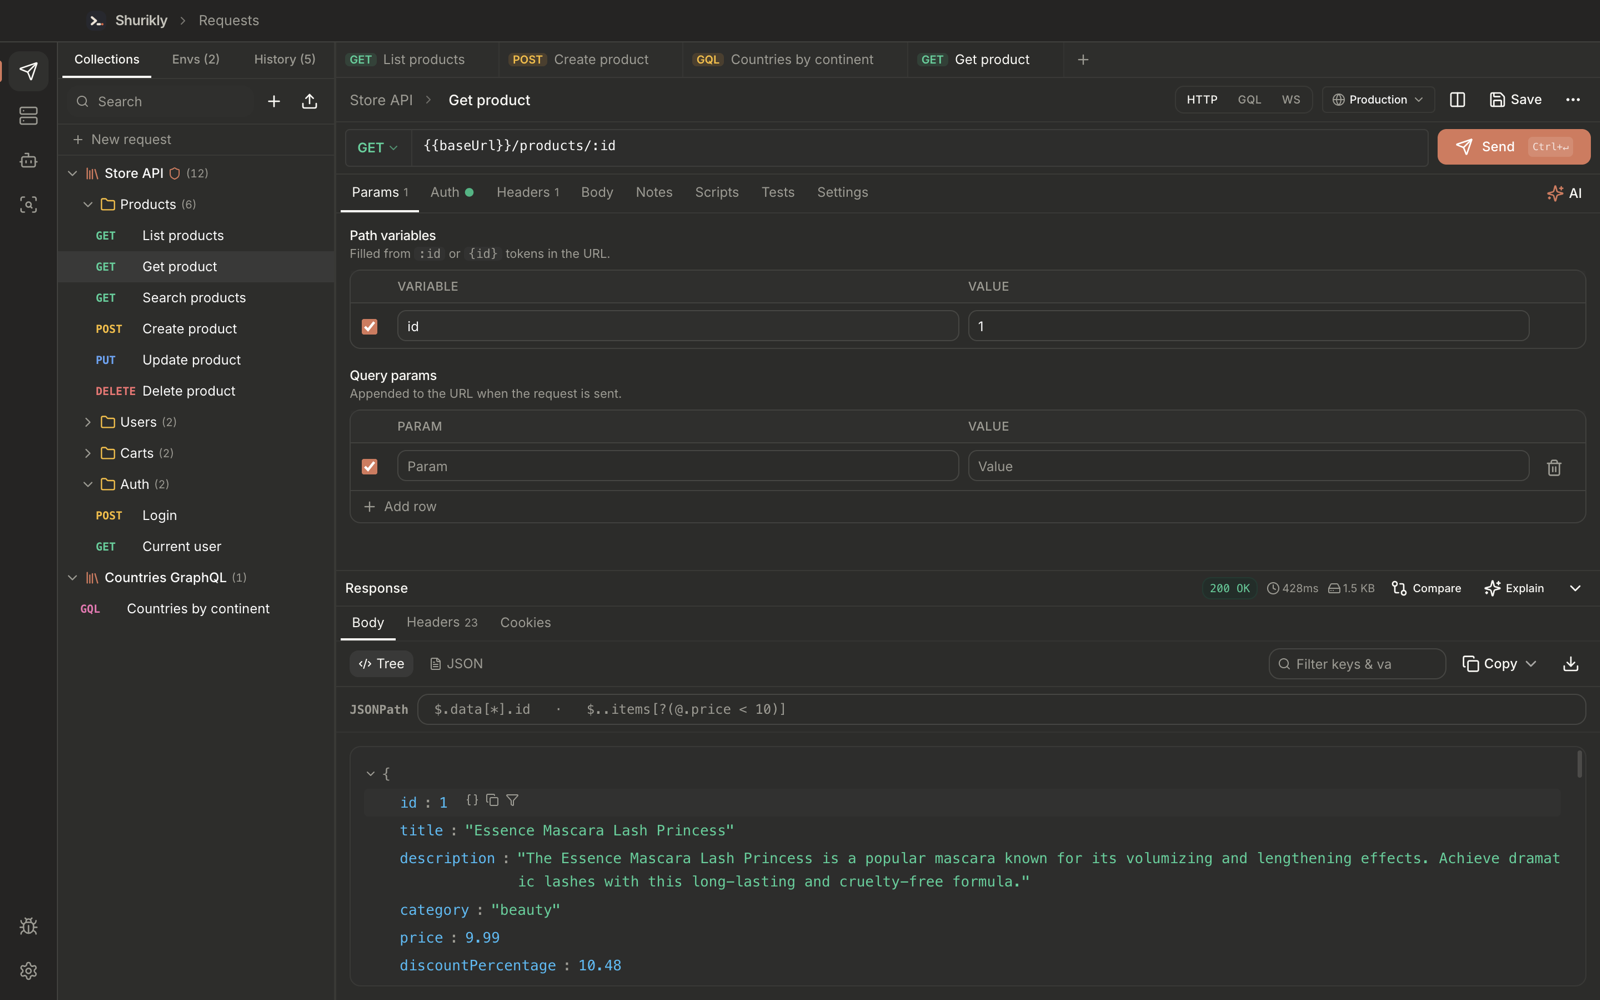 Path variables:
 {{baseUrl}}/products/:id with id = 1, sent with the Production environment.
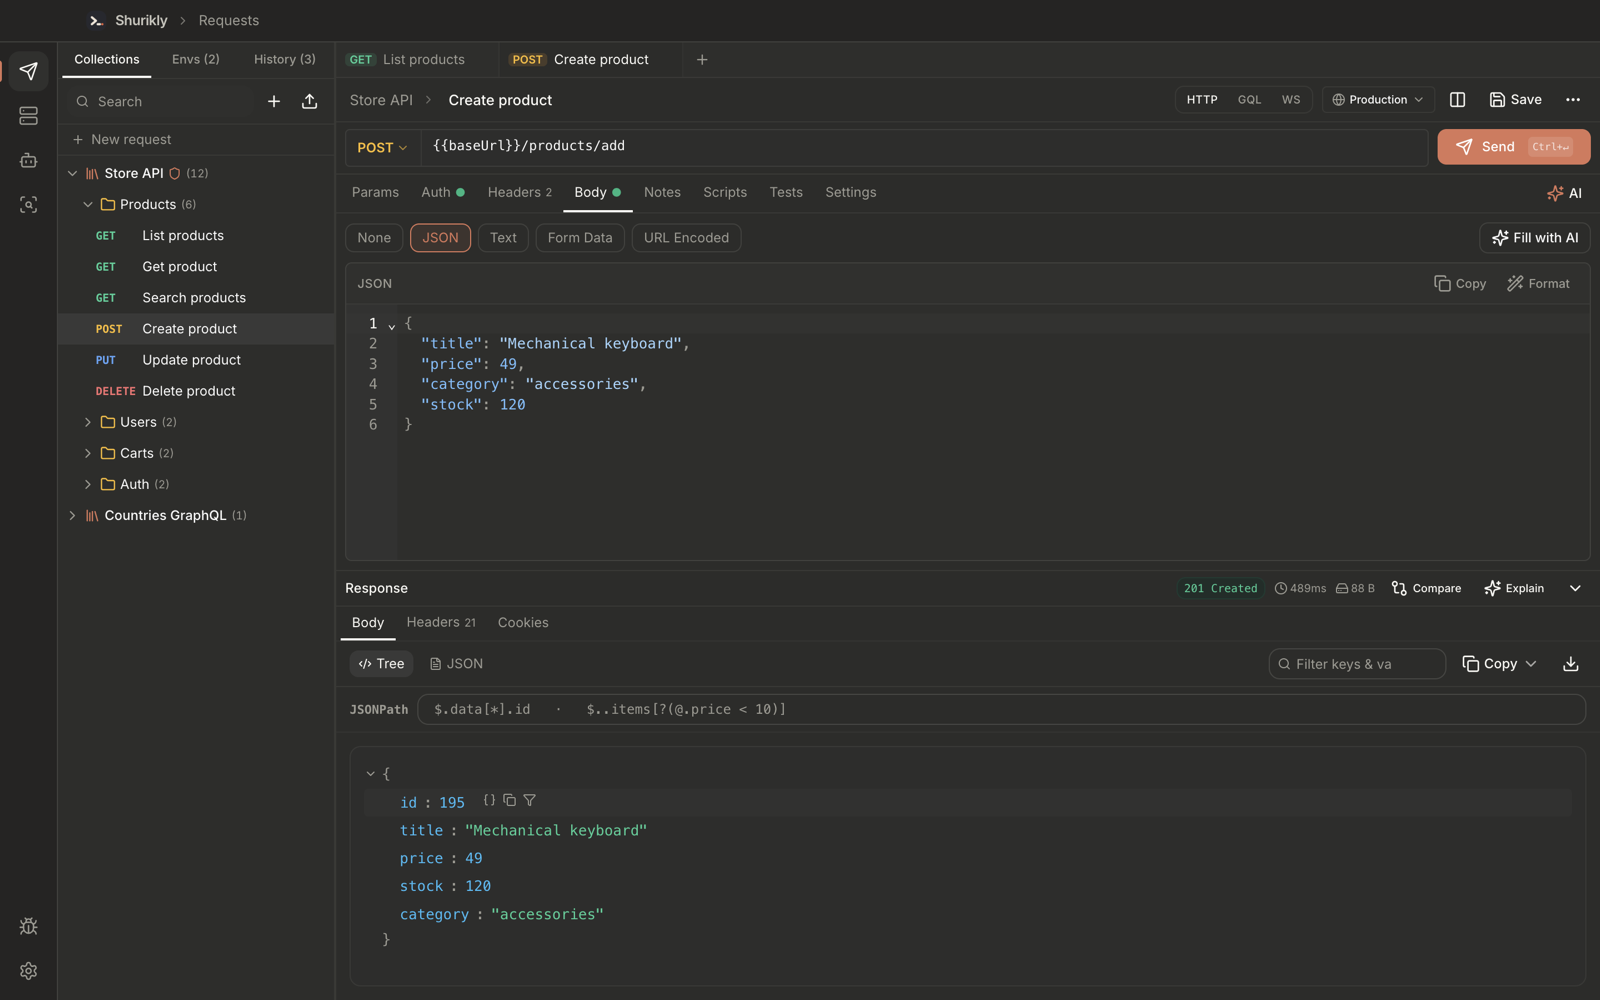 A
A POST with a JSON body. The response shows 201 Created and the new record.
All HTTP traffic is executed in the Electron main process, not in the web renderer, so requests are not subject to browser CORS rules and behave like a real client.
Authentication
| Type | Notes |
|---|---|
| Inherit | Use the auth of the parent folder or collection |
| None | Send no auth |
| API key | Header or query parameter |
| Bearer | Authorization: Bearer <token> |
| JWT | Build and sign a JWT for the request |
| Basic | Username and password |
| Digest | HTTP Digest challenge / response |
| OAuth 1.0 | Signed requests |
| OAuth 2.0 | Authorization code, client credentials and password grants; token retrieval and reuse |
| AWS Signature | Signs requests for AWS services |
| Hawk | Hawk authentication |
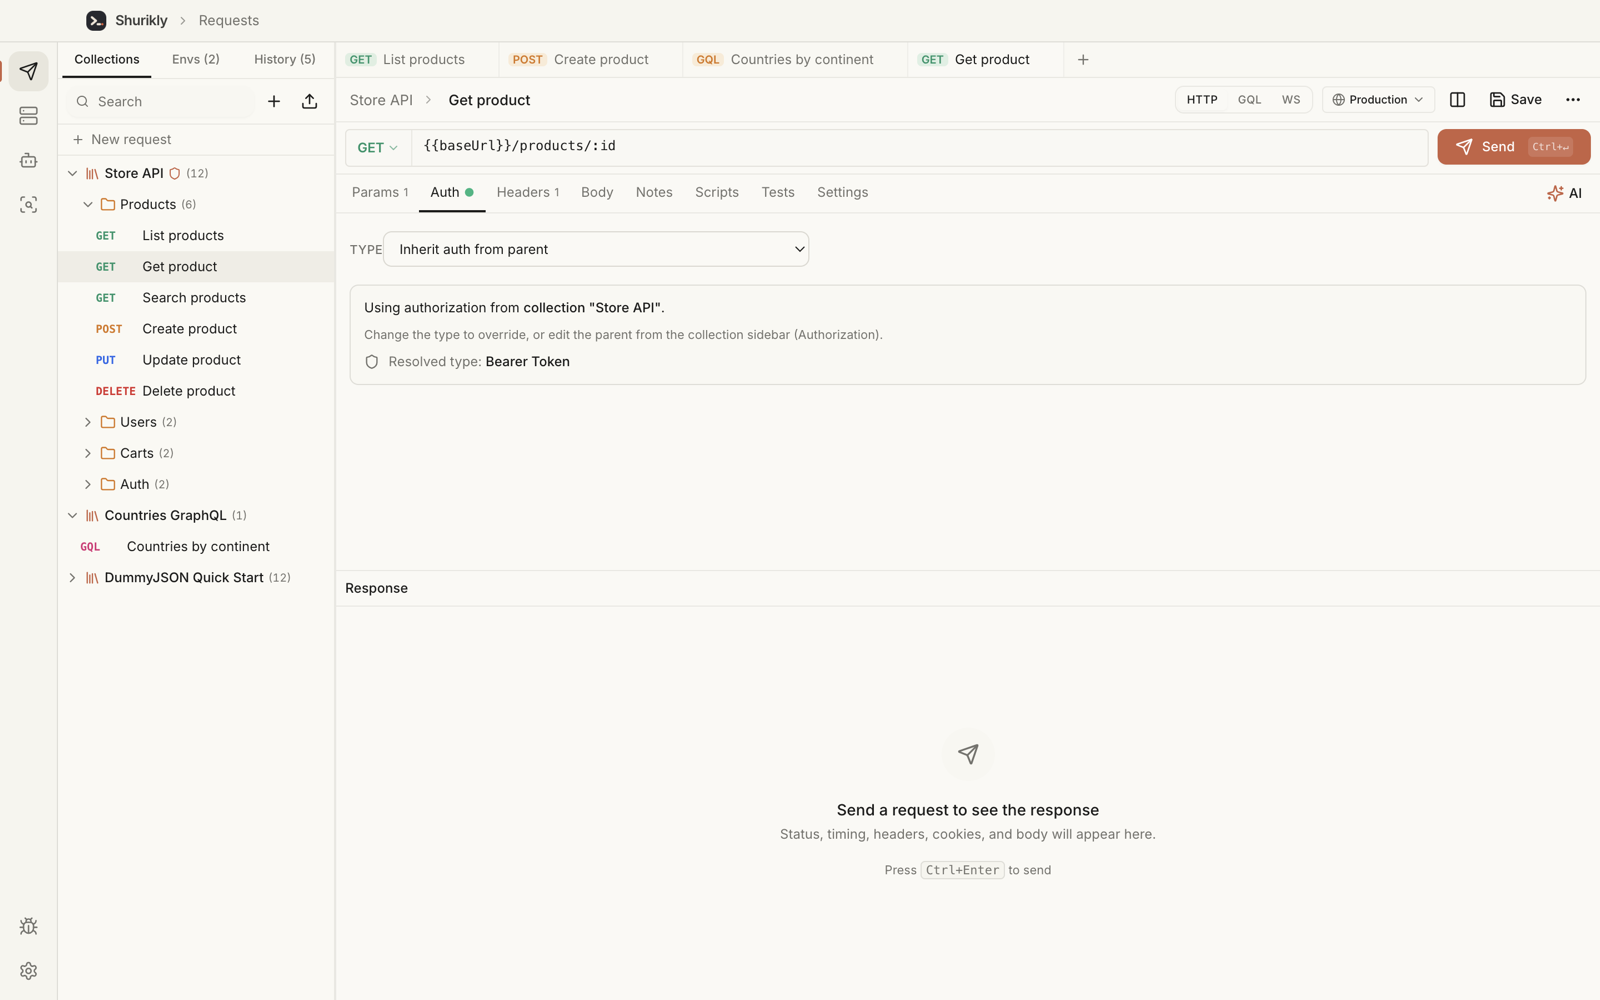
Requests default to Inherit auth from parent. The Auth tab shows which folder or collection the credentials come from and the resolved type, so you can set a token once on the collection and every request uses it.
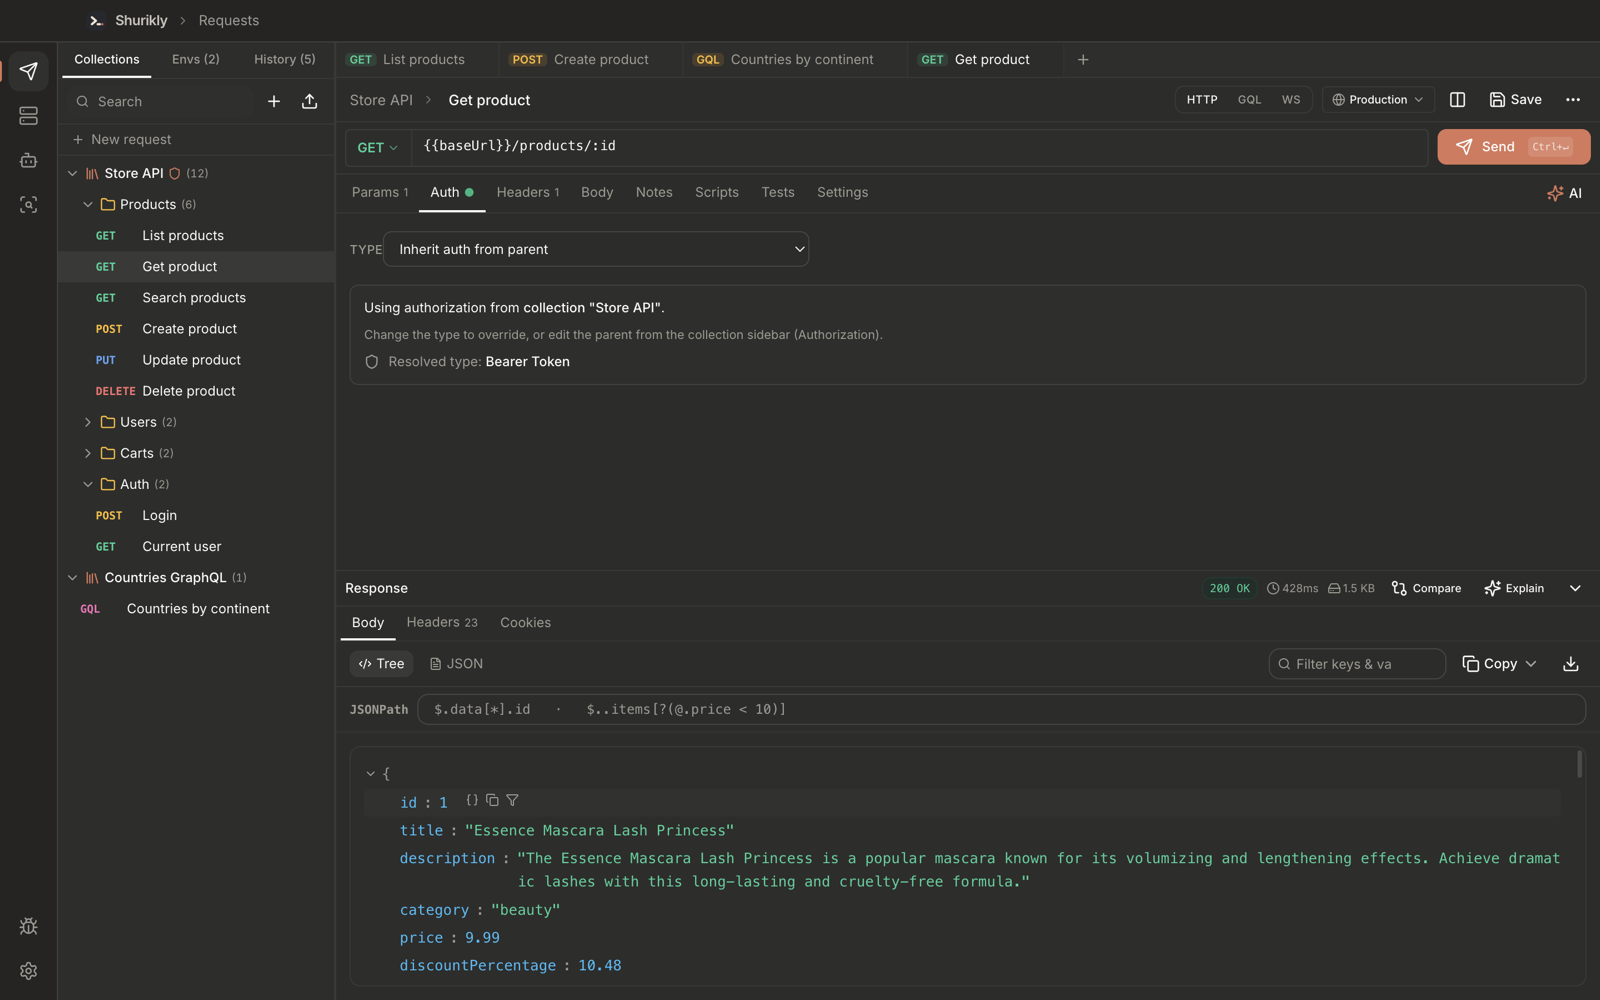 The request inherits Bearer Token auth from the Store API collection. Set it via the collection menu → Authorization.
GraphQL
Switch a request to GQL in the request bar, or create one from a collection menu → New GraphQL request.
- Enter the endpoint URL and click Fetch schema to run introspection. The status changes to Schema available.
- Write the query in the Query tab. The editor offers schema-aware autocomplete and validation, and Format query tidies it.
- Put variables as JSON in the Variables tab.
- If the document has several operations, pick one from Operation.
- Send. The response shows the HTTP status and a GraphQL status (GraphQL OK or errors), with separate Data and Errors views.
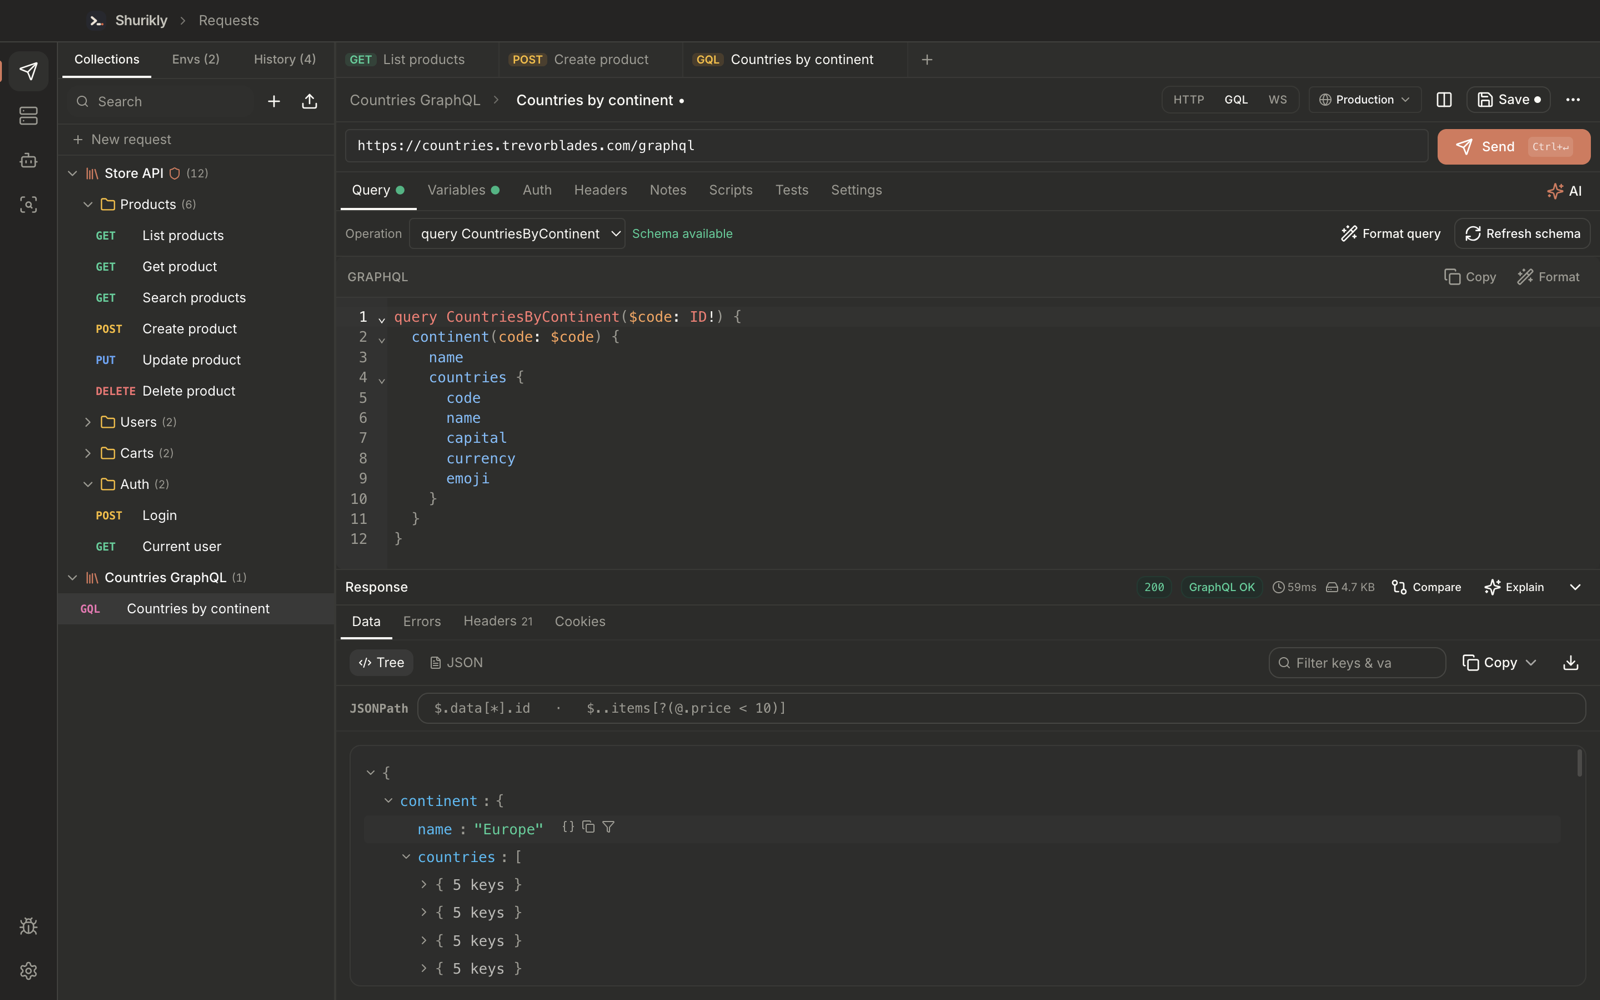 A GraphQL query with variables against a public endpoint. The schema is loaded and the response is shown in the Data view.
Response inspection
The response bar shows the status, time, size and, when the request has tests, a pass count such as 4/4 tests.
- Body → Tree — a collapsible JSON tree. Hover a node to copy the value, copy the path or filter to that node. Type in Filter keys & values to narrow a large body.
- Body → JSON — the raw, formatted body, with find-in-body.
- JSONPath — query the body, for example
$.products[*].titleor$..items[?(@.price < 10)]. - Copy — copy the body as JSON or text; the download icon saves the body to a file.
- Headers and Cookies — every response header and cookie, with a count on the tab.
- Tests — per-assertion results for the request's tests.
- Previews for images, SVG, PDF, audio and video; a hex view for other binary bodies.
- Large-response guards keep the UI responsive on very large bodies.
- Explain asks your AI provider to describe the response (AI must be configured).
Compare
Click Compare in the response bar to diff the latest response (B) against a run you pick (A):
- the previous run of the same request,
- a pinned baseline, or
- another open tab.
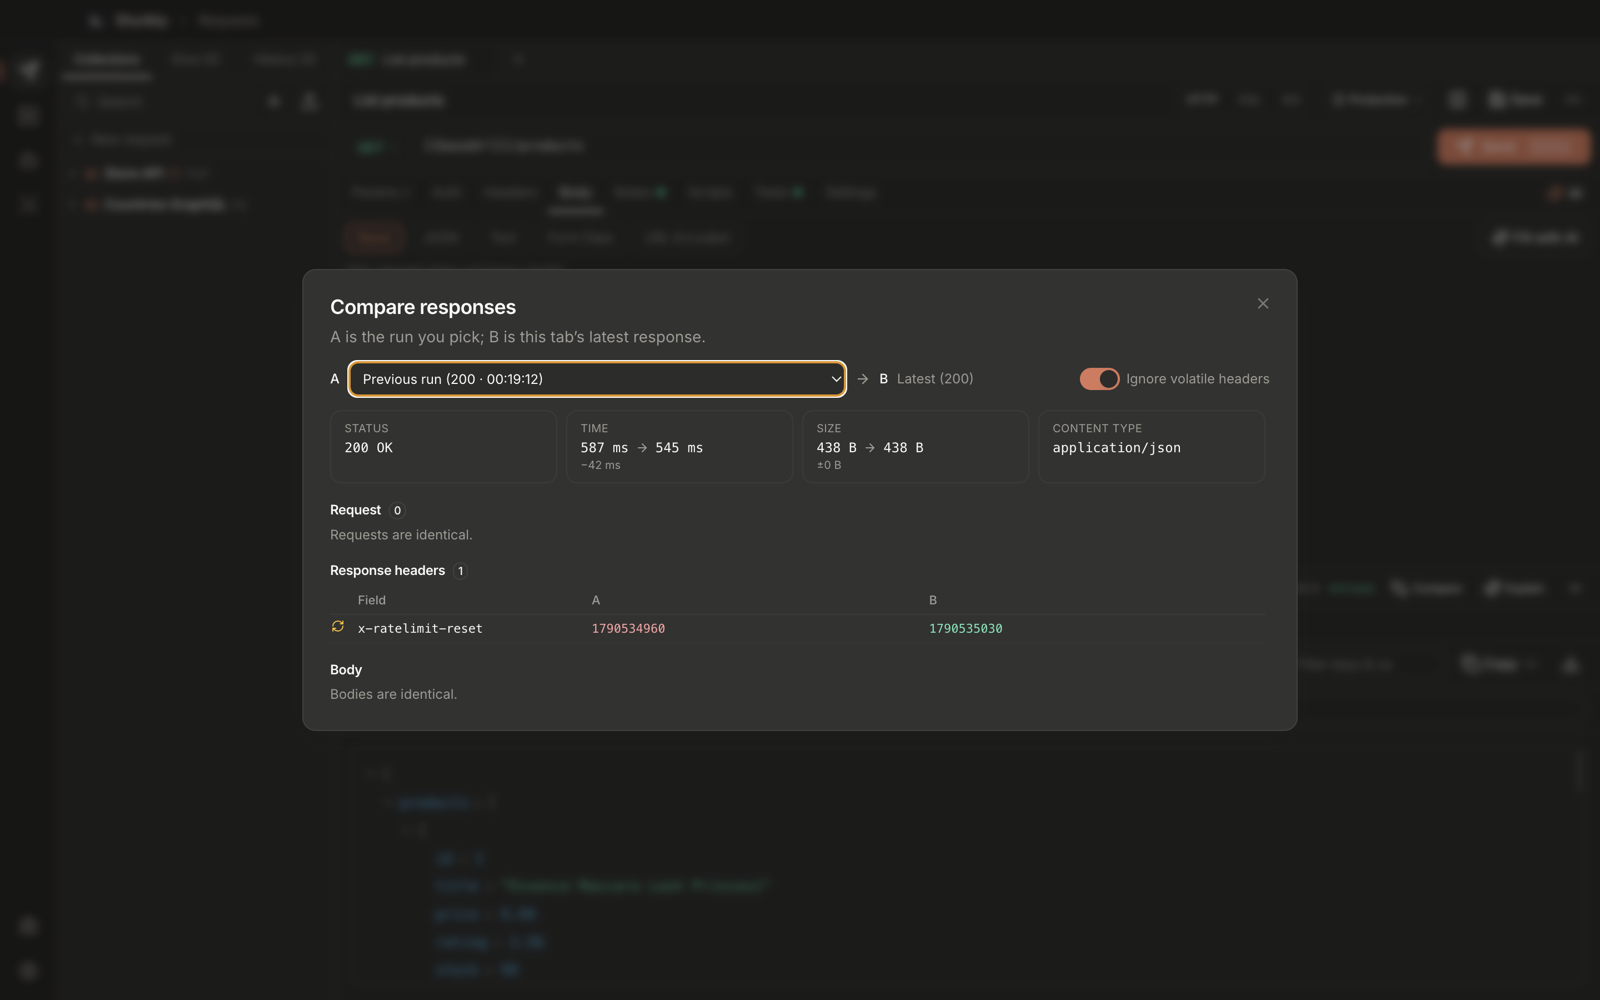 Comparing two runs of the same request: status, time (−42 ms), size and content type at the top, then request, header and body differences.
| Part | What it tells you |
|---|---|
| Summary cards | Status, time, size and content type for A → B, with the change. |
| Request | What changed in the request between the runs — so you can tell whether a difference came from the server or from your edit. |
| Response headers | Added, removed and changed headers. Ignore volatile headers hides noise such as dates and rate-limit counters. |
| Body | JSON differences path by path, or a text diff for non-JSON bodies. |
Collections, folders and history
- Collections group related requests; folders nest inside collections. The sidebar shows the request count next to each one, and a shield icon when the collection sets auth.
- Inheritance — auth, headers and pre-request scripts set on a collection or folder apply to every child request. Child keys win when names collide.
- Drag and drop requests and folders to reorder or move them.
- Tabs keep several requests open at once; unsaved changes are marked with a dot.
- History records every request you send with its method, URL, status and time. Filter by method, click an entry to reopen it, or clear the list.
Right-click a collection (or use its … menu) for collection actions:
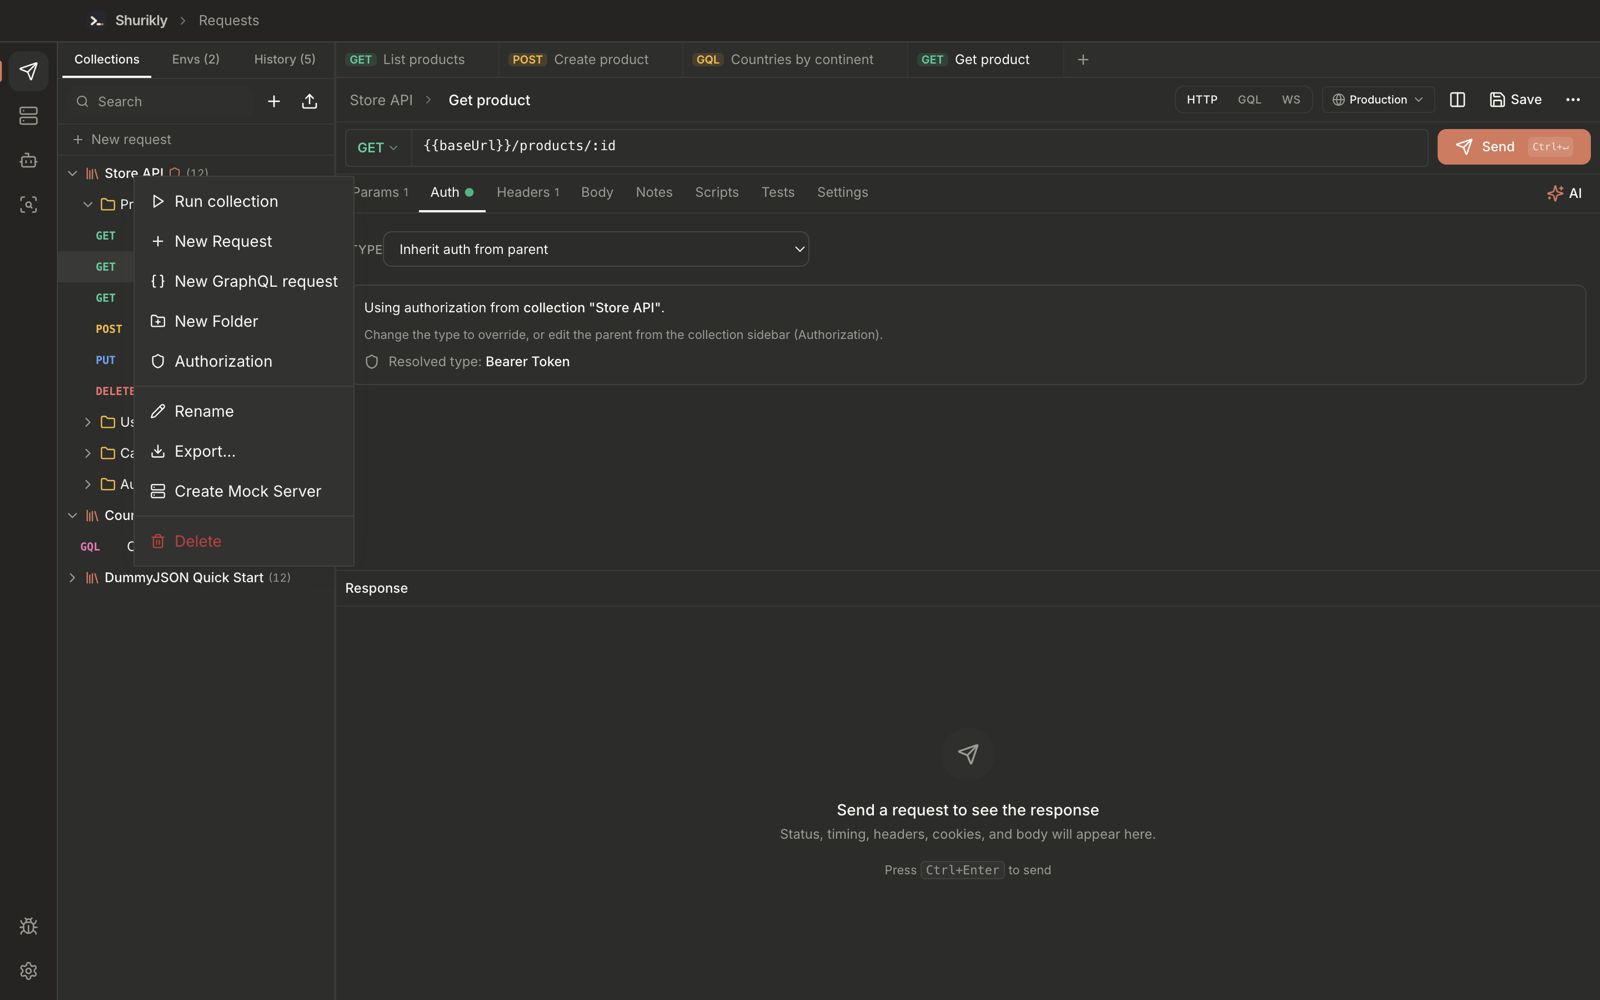 Collection menu: Run collection, New Request, New GraphQL request, New Folder, Authorization, Rename, Export…, Create Mock Server and Delete.
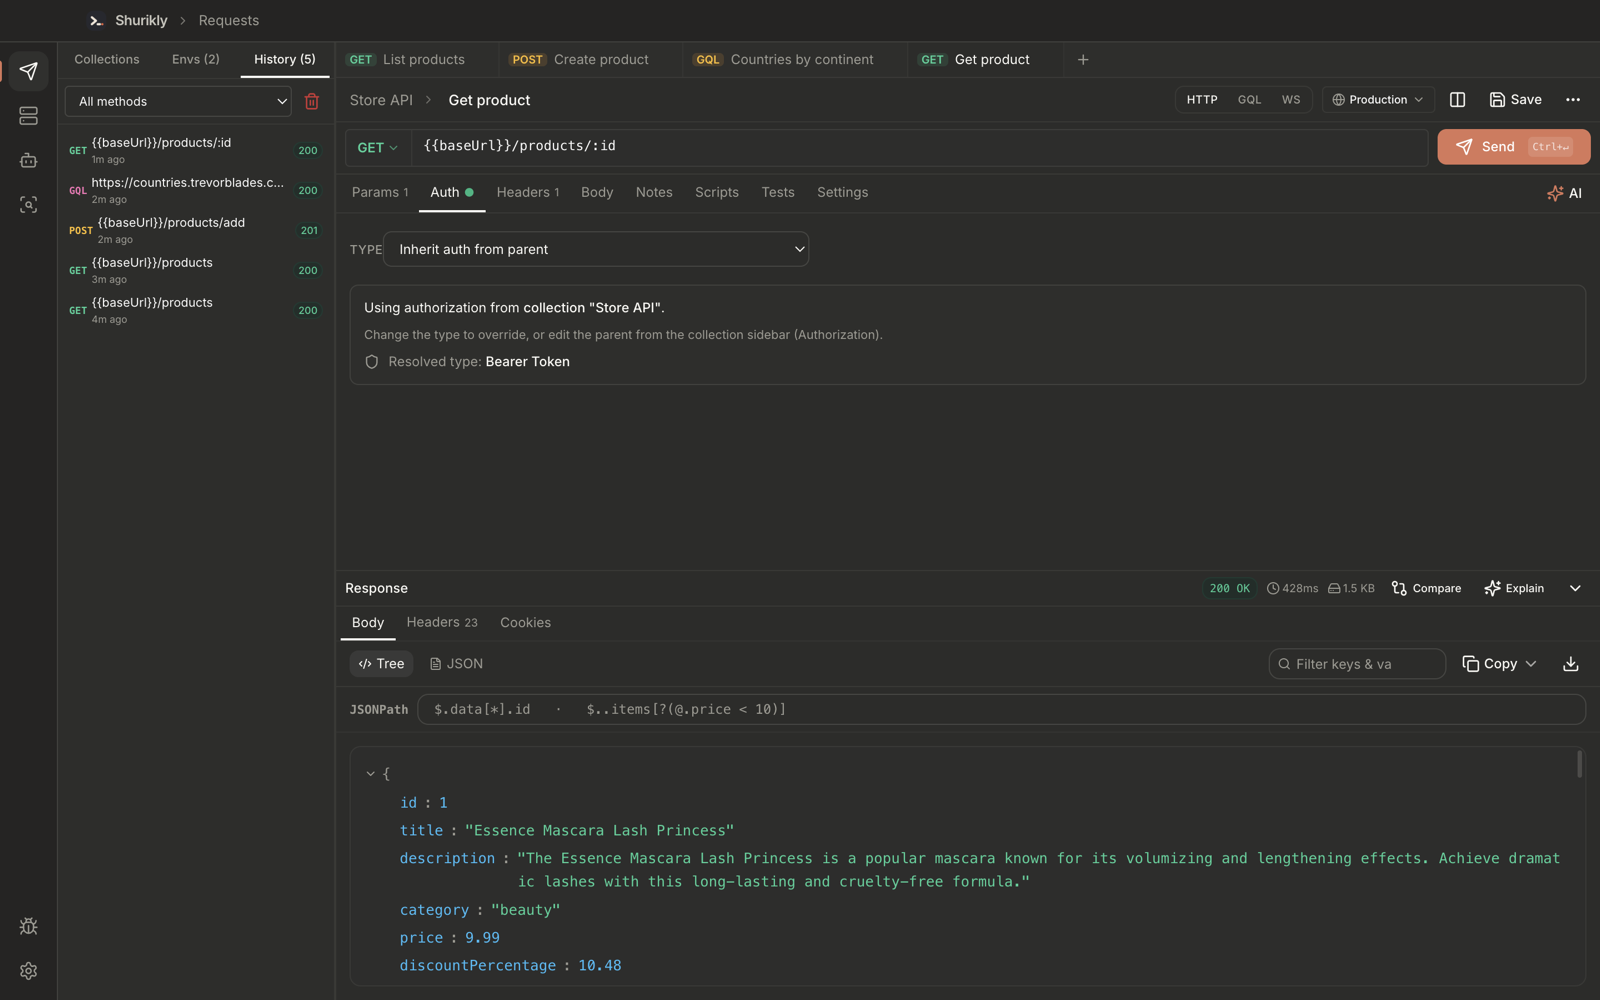 History lists every send with its status code. The method filter and clear button are at the top.
Environments and variables
- Open the environment menu in the request bar (it shows No Environment or the active one) and choose Manage Environments…, or use the Envs tab in the sidebar.
- Click
+to add an environment such as Production or Local mock. - Add variables as rows — for example
baseUrl = https://dummyjson.com. Untick a row to disable it. - Mark one environment Active. Its variables are substituted wherever you write
{{variableName}}— URL, params, headers, body and auth.
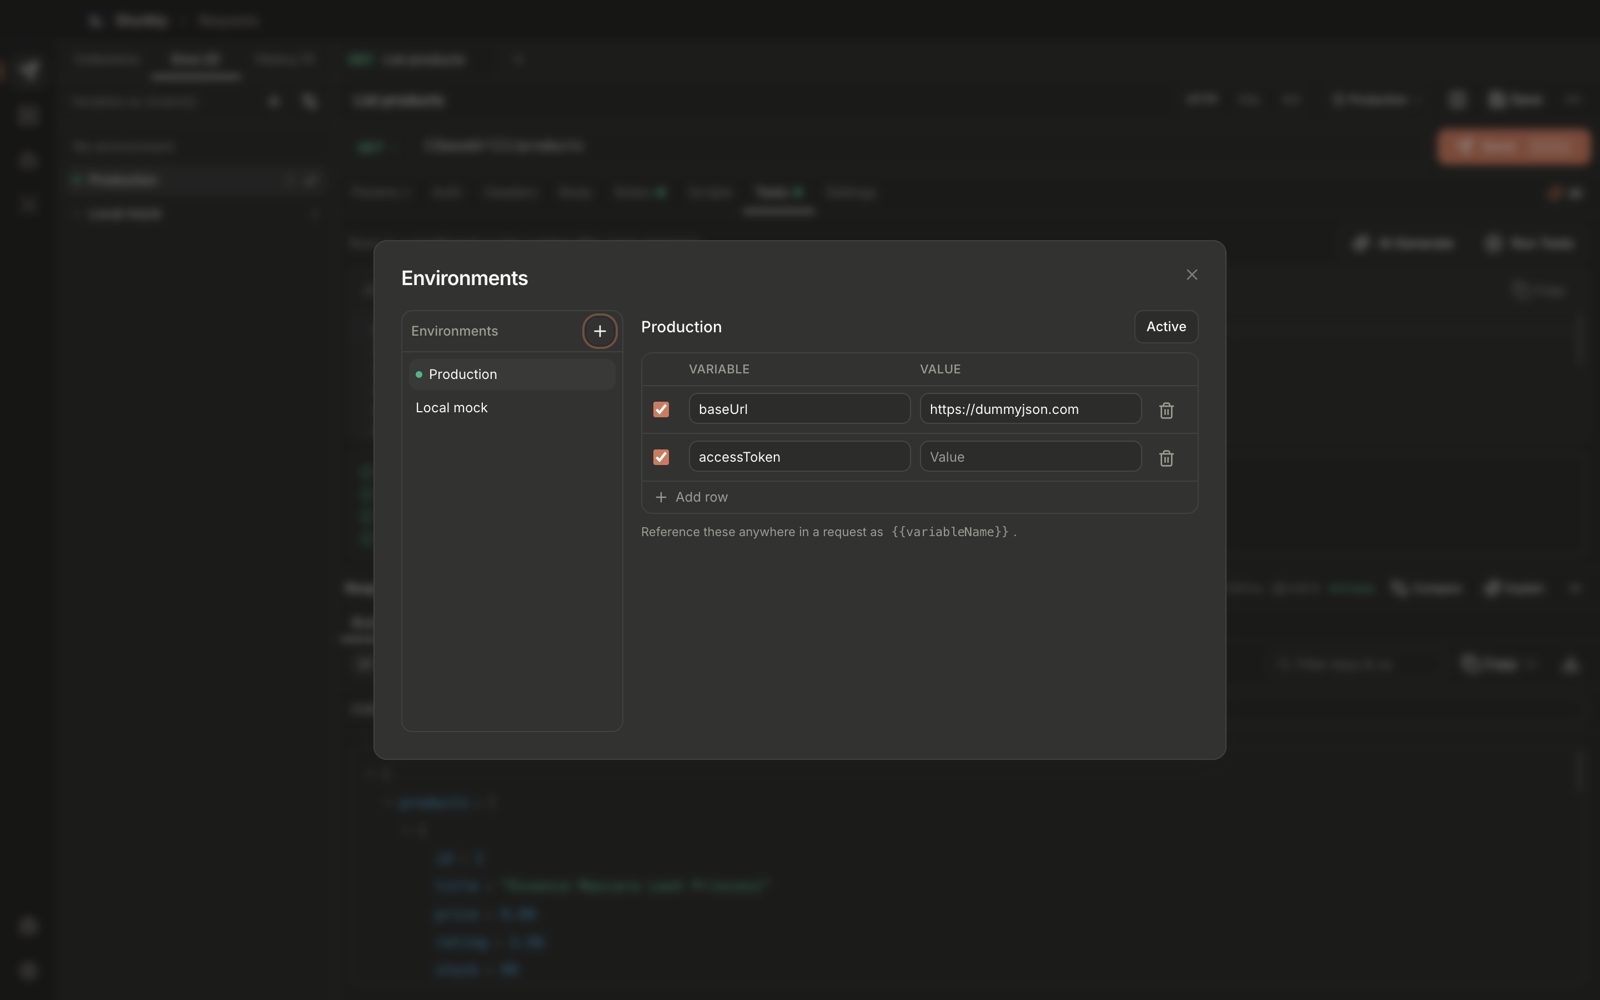 Two environments, Production (active) and Local mock.
 {{baseUrl}} and {{accessToken}} are used by every request in the Store API collection.
Tip: pair a Local mock environment (baseUrl = http://127.0.0.1:4010) with a mock server to switch the whole collection between the real API and the mock with one click.
Scripts, tests and the collection runner
Pre-request scripts
The Scripts tab runs JavaScript before the request is sent. Scripts can read and set environment variables — for example, to compute a signature or a timestamp. Collection and folder scripts run first, then the request's own script.
Tests
The Tests tab holds pm.test-style assertions that run in a sandbox after every response. The sandbox provides pm.test(name, fn), pm.response.status, pm.response.headers, pm.response.responseTime, pm.response.json() and pm.response.text(). A test passes unless its function throws.
pm.test("status is 200", function () {
  if (pm.response.status !== 200) throw new Error("Expected 200, got " + pm.response.status)
})
pm.test("returns a list of products", function () {
  const body = pm.response.json()
  if (!Array.isArray(body.products)) throw new Error("products is not an array")
})
pm.test("responds in under 1.5s", function () {
  if (pm.response.responseTime > 1500) throw new Error("slow: " + pm.response.responseTime + "ms")
})
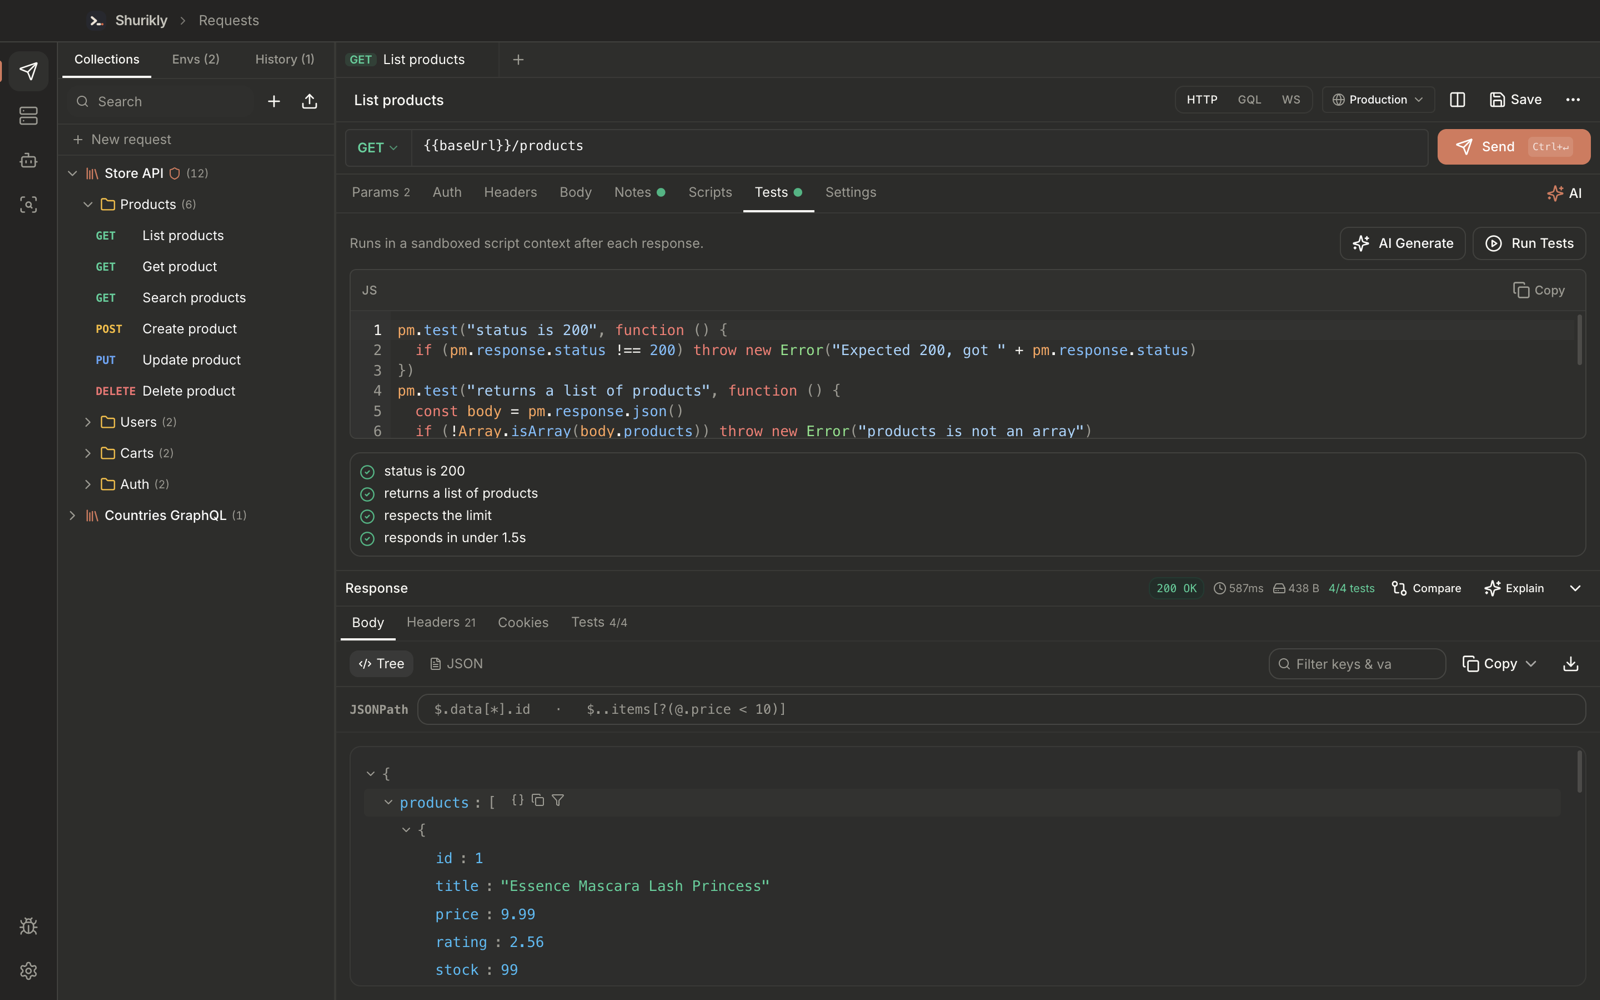 Four assertions on List products, all passing. Results appear under the editor and as 4/4 tests in the response bar.
AI Generate writes assertions from the latest response, and Run Tests re-runs them without re-sending the request.
Collection runner
Choose Run collection (or Run folder) from the sidebar menu. Set a delay between requests and whether to stop on failure, then click Run. The runner sends every request in order with inherited auth, headers and scripts, runs each request's tests, and reports totals plus a per-request line with method, status and time.
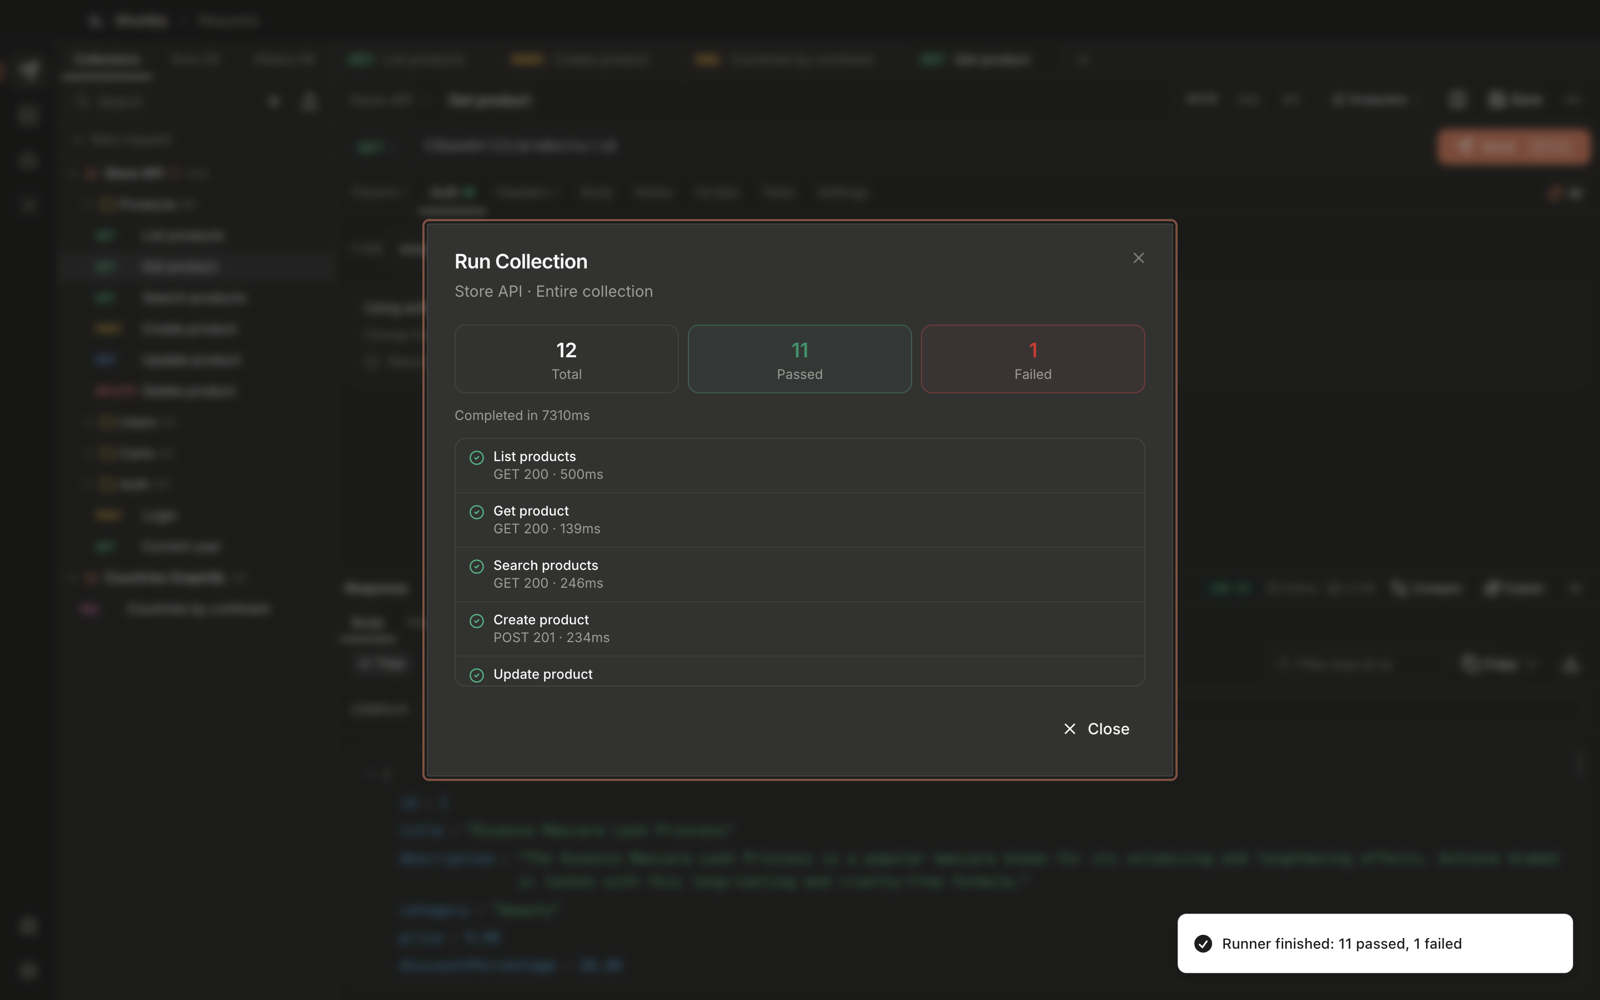 The Store API collection: 12 requests, 11 passed and 1 failed (
/auth/me without a token), completed in 7.3 s.
Import and export
| Direction | Formats |
|---|---|
| Import | Postman collections, OpenAPI (JSON / YAML, including Swagger 2 and $ref resolution), cURL commands |
| Export | Postman collection, OpenAPI, cURL, Markdown API docs, HTML API docs |
| Code snippets | cURL, JavaScript (fetch), Node.js, Python — with inherited auth and headers applied |
Code Scanner
Code Scanner turns a project folder into a Shurikly collection. Code is read locally and never uploaded.
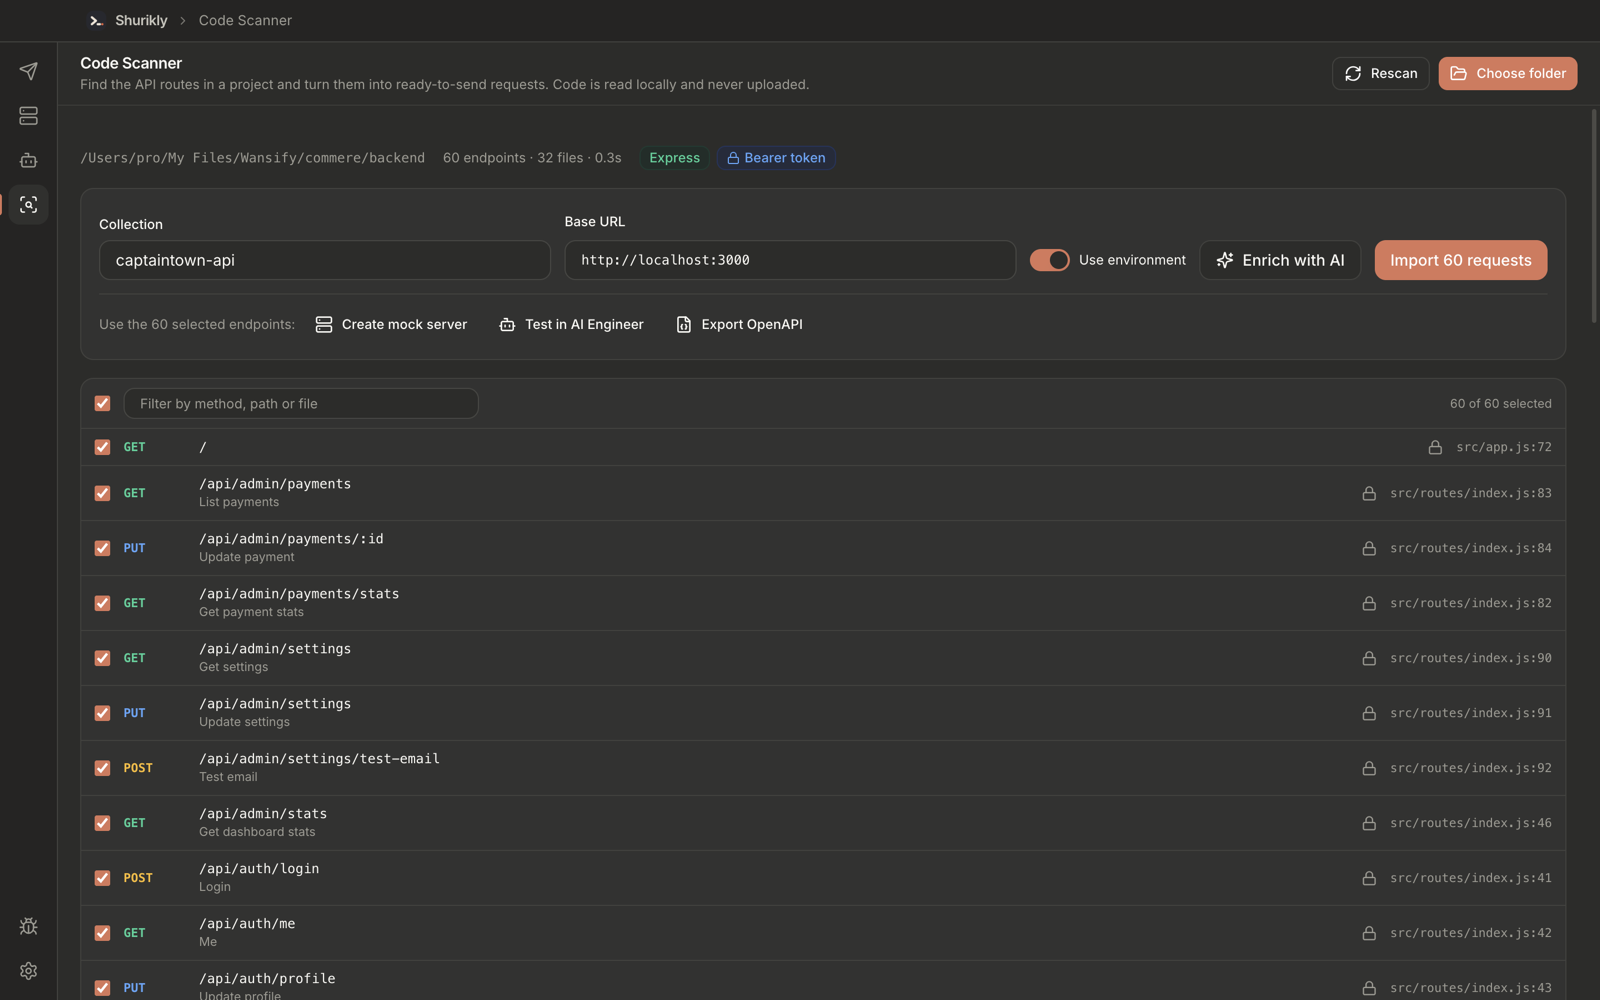 Scanning an Express backend: 60 endpoints in 32 files in 0.3 s, with the framework and auth scheme detected.
How it works
- Open Code Scanner and click Choose folder. For safety, only folders picked in the system dialog can be scanned.
- Shurikly detects the frameworks in use and extracts endpoints from the backend and HTTP calls from the frontend.
- Frontend calls are linked to backend routes, so you can see which endpoints are used and which calls have no matching route.
- Review the results, then click Import N requests to create the collection. Rescan re-reads the same folder.
Reading the results
| Part | What it shows |
|---|---|
| Summary line | Folder path, endpoint and file counts, scan time, and chips for each detected framework and auth scheme (for example Express, Bearer token). |
| Collection | Name of the collection to create — taken from the project's package.json or folder name. Editable. |
| Base URL | Detected from .env files, dev-server proxies or the listen port. With Use environment on, it is stored as {{baseUrl}} in an environment instead of being hard-coded into every request. |
| Endpoint list | Method, path and a generated name for each endpoint, with the source file and line (for example src/routes/index.js:83). A lock icon marks endpoints that need auth. Filter by method, path or file, and untick endpoints to leave them out. |
| Hand-off bar | Send the selected endpoints straight to Create mock server, Test in AI Engineer or Export OpenAPI. |
Supported sources in 1.0.0
| Category | Supported |
|---|---|
| Node.js backends | Express, Fastify, NestJS, Next.js (app router and pages router) |
| Python backends | FastAPI, Flask, Django / Django REST Framework |
| Specifications | OpenAPI 3 and Swagger 2 files in the repository |
| Frontend calls | fetch, axios, ky, ofetch, superagent, SWR, RTK Query, Angular HttpClient, generated SDKs, GraphQL clients, wrapper functions across files |
| Base URLs | .env files and dev-server proxy configuration |
| Request bodies | zod, joi, yup, TypeBox, Fastify JSON Schema, express-validator |
| Auth detection | Bearer, API key, Basic and token-prefix schemes from middleware and decorators |
Re-scan without losing work
When you scan again, Shurikly merges the new results into the existing collection using structural fingerprints. Requests you edited keep your changes; new endpoints are added and removed ones are flagged.
Hand-offs
- Export as OpenAPI — produce a spec from the scanned collection.
- Create a Mock Server from the scan.
- Send to AI Engineer for analysis and test generation.
AI enrichment (optional)
With an AI provider configured, Code Scanner can enrich endpoints with descriptions and better example bodies. Each run asks for explicit consent, code snippets are scrubbed of secrets before sending, and answers are checked against the code that was actually sent.
AI features
Providers
| Provider | Notes |
|---|---|
| OpenAI | Your own API key |
| Anthropic | Your own API key |
| Google Gemini | Your own API key |
| OpenAI-compatible | Any endpoint that speaks the OpenAI API (self-hosted gateways, other vendors) |
| Ollama | Fully local models; nothing leaves your machine |
Open Settings → AI to choose a routing mode:
| Mode | Behavior |
|---|---|
| Cloud | Every request uses the selected cloud provider (OpenAI, Anthropic, Gemini, DeepSeek or OpenRouter). |
| Ollama (Local) | Every request runs on local models; nothing leaves your machine. |
| Hybrid | Light tasks run locally; heavy tasks use the selected cloud provider. |
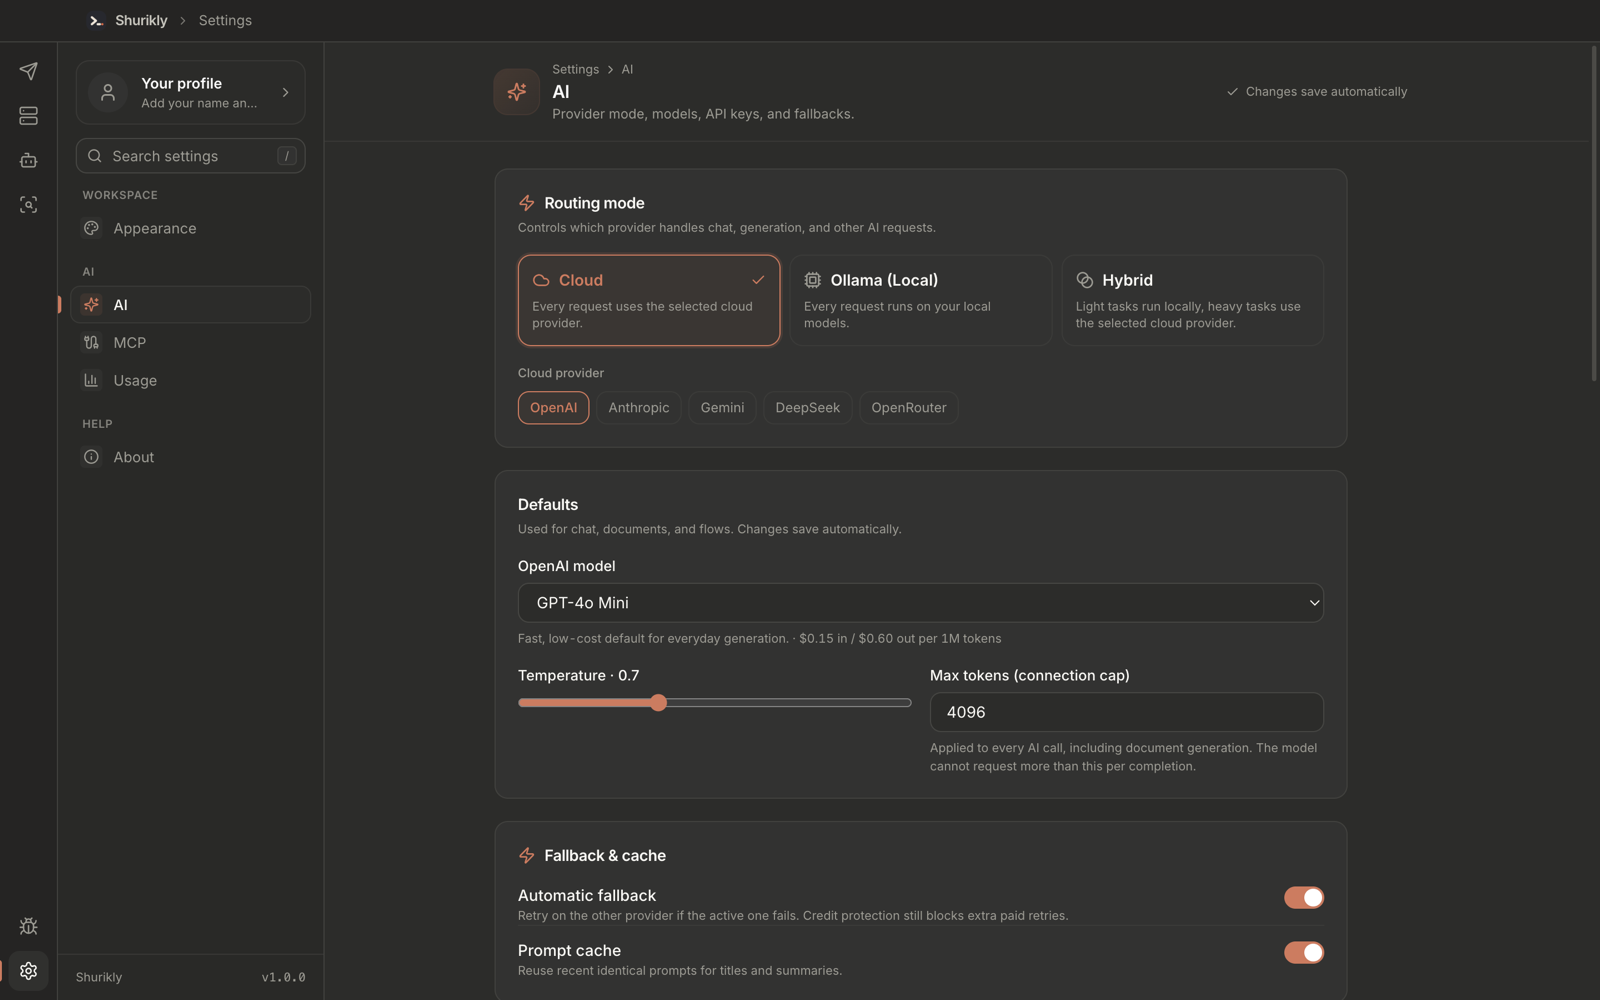 Settings → AI: routing mode, cloud provider, default model with pricing, temperature, max tokens, and fallback and cache switches.
Automatic fallback retries on the other provider if the active one fails, and Prompt cache reuses answers to identical prompts. Usage is tracked locally and a budget guard can stop requests once a spending limit is reached. API keys are encrypted with the operating system's secure storage (Electron safeStorage).
What AI can do
- Generate a request from a plain-English description.
- Explain a response — what it contains and what went wrong.
- Write tests for a request.
- Fix a failing request with a suggested change.
- Document a collection as readable API docs.
AI Engineer
AI Engineer is an analysis and testing workflow built on the same HTTP engine, environments and collections as the rest of the app.
Walkthrough
- Open AI Engineer, pick a collection in the top-right menu (or Import OpenAPI), and click Analyze API. The Test suite panel summarizes the API — endpoints, auth-related endpoints and protected ones.
- Click Generate tests. Without an AI provider you get baseline tests (reachability and missing-auth probes); with one, AI adds functional, edge-case and auth tests.
- Click Run safe tests. Results stream into Latest run with a passed / failed / skipped count.
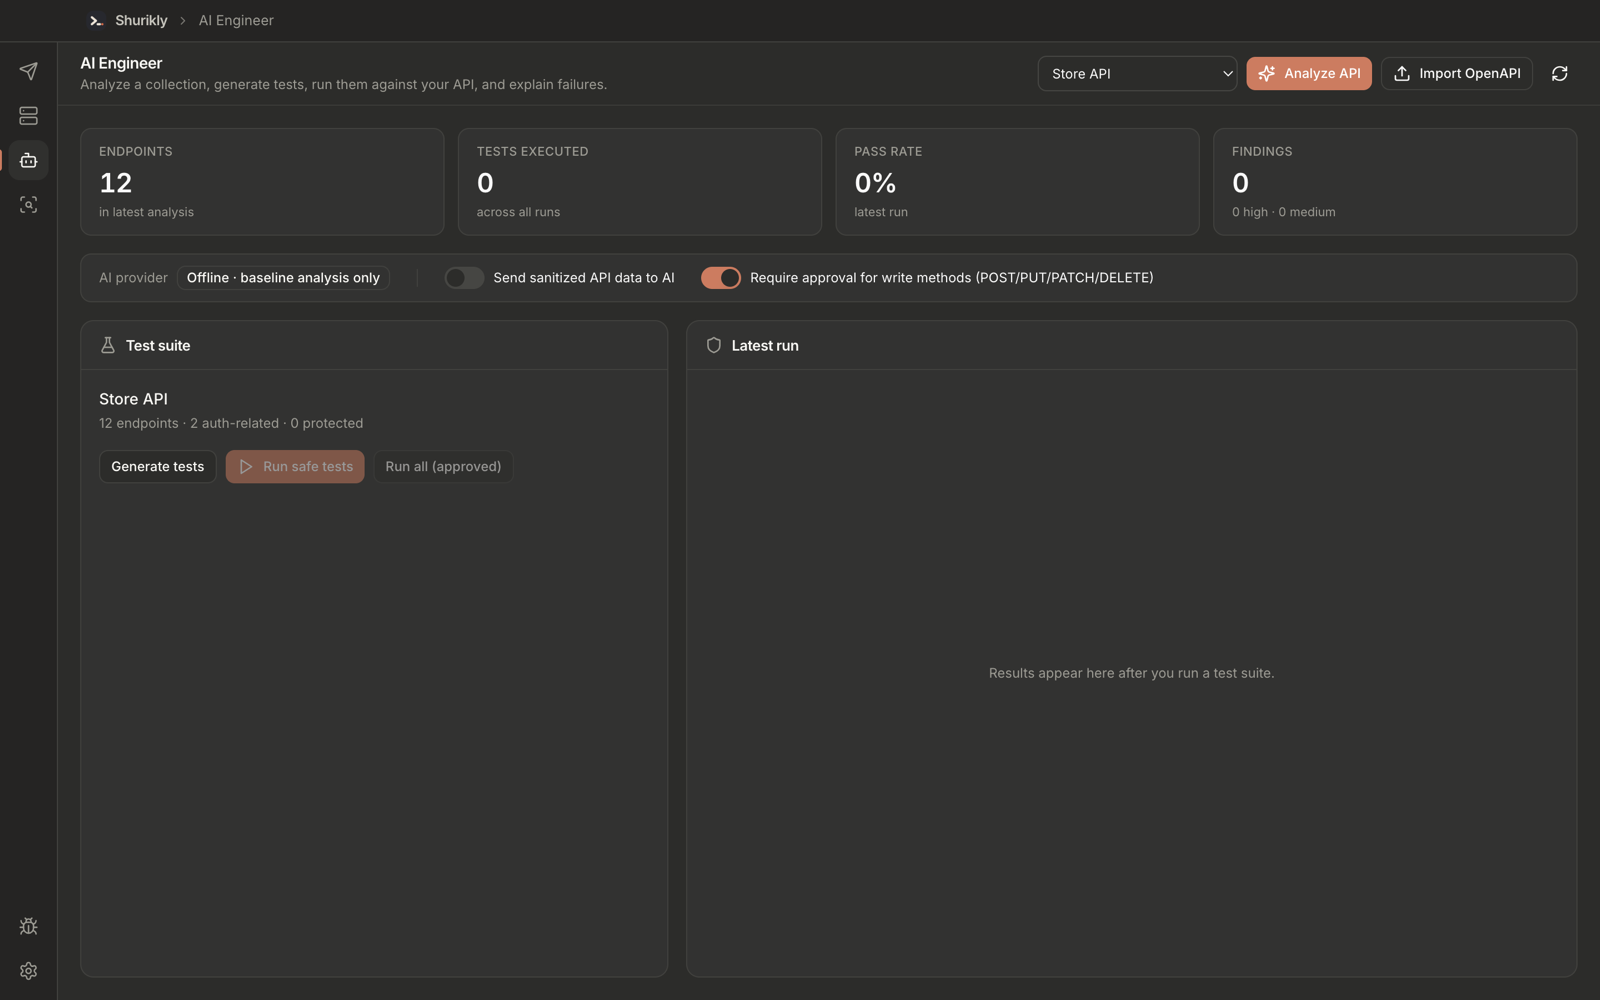 After Analyze API: 12 endpoints found, with 2 of them auth-related.
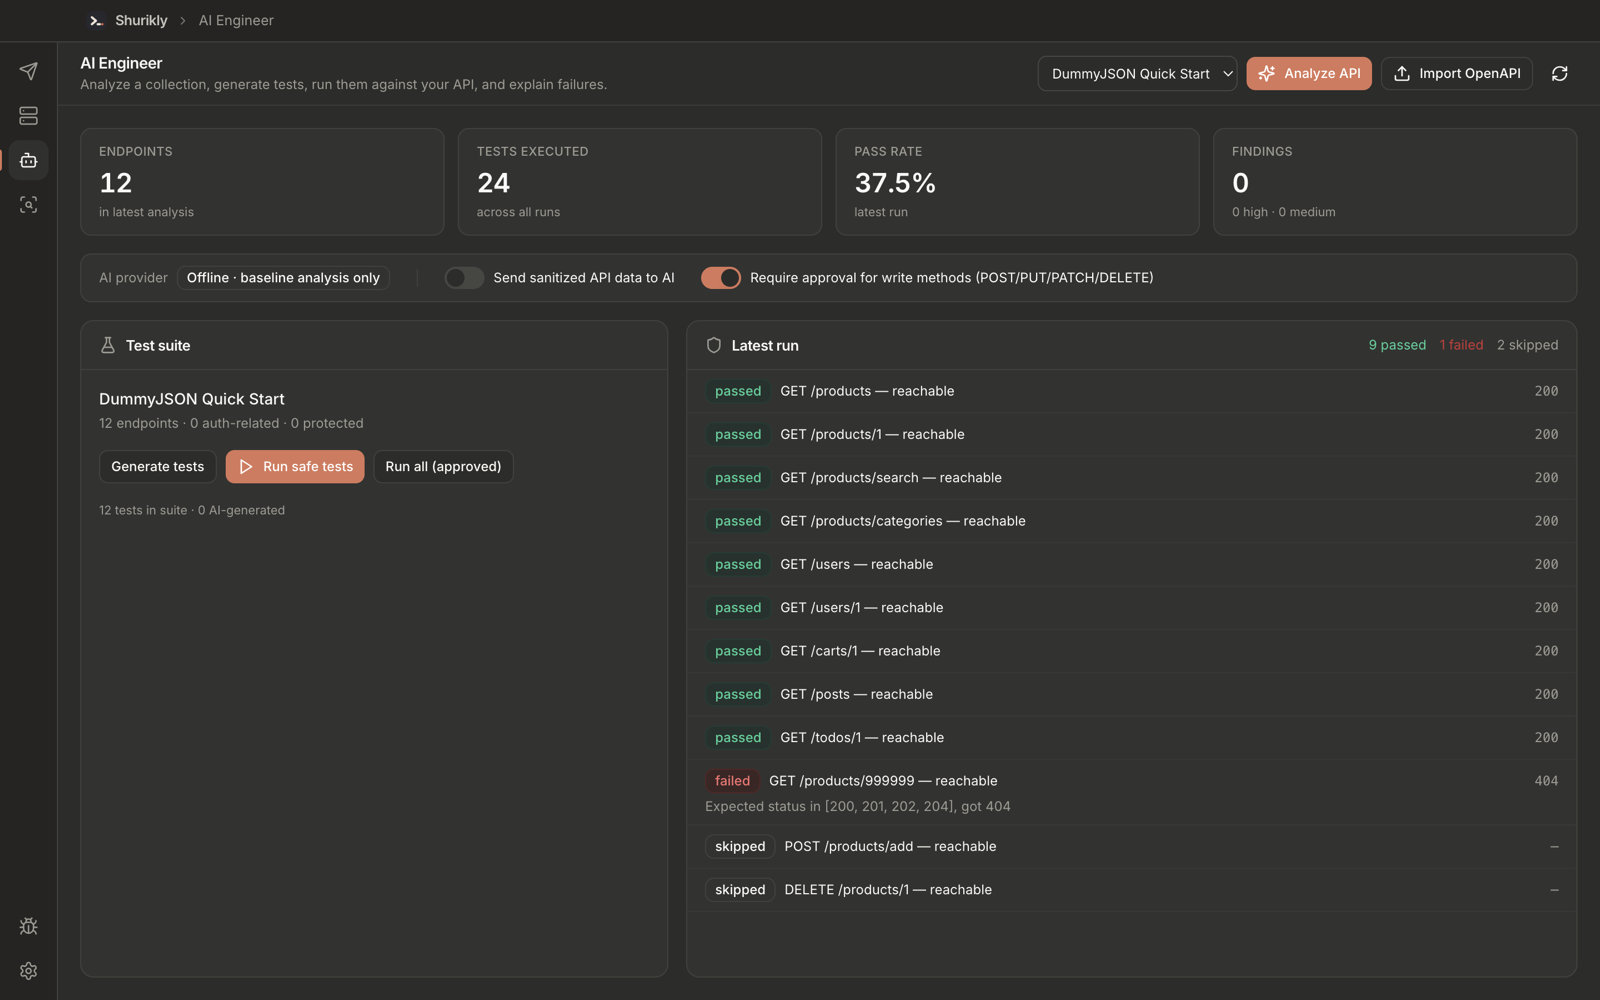 A run of 12 baseline tests: 9 passed, 1 failed (
/products/999999 returned 404) and 2 write tests skipped until approved.
The four cards at the top show Endpoints in the latest analysis, Tests executed across all runs, Pass rate and Findings (grouped by severity).
Works without an AI provider
- Structural API analysis of a collection or an OpenAPI document.
- Baseline test generation — reachability checks and missing-auth probes.
- Test execution through the same path as the Collection Runner.
- Evidence-backed results: every failure keeps the request, the response and the assertion that failed.
With an AI provider
Only when Send API data to AI provider is turned on (it is off by default), and only after secrets are redacted:
- A narrative API summary after analysis.
- Additional functional, edge-case and auth tests.
- Failure analysis that explains why a test failed.
Execution safety
- Run safe tests executes only low-risk GET, HEAD and OPTIONS tests.
- POST, PUT, PATCH and DELETE tests are skipped while Require approval for write methods is on (the default). Choose Run all (approved) to run them.
- The AI provider chip shows what is in use — Offline · baseline analysis only when no provider is configured.
Mock Server
Run local HTTP mock APIs from your collections.
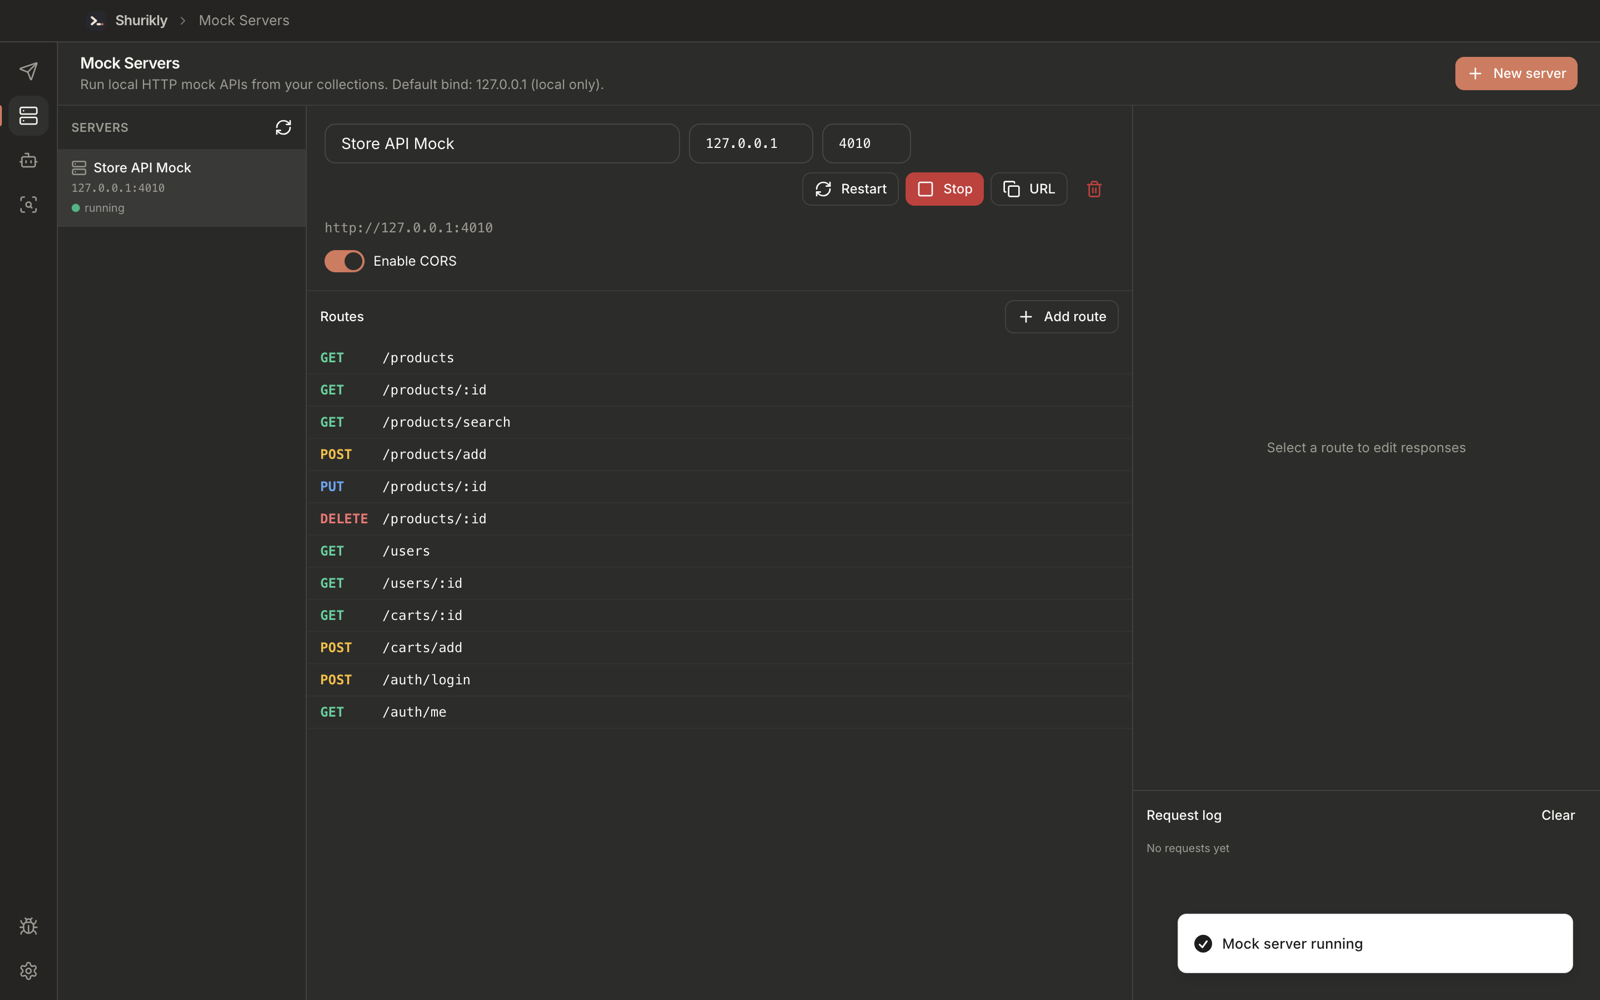 Create Mock Server on the Store API collection: one route per request, with
 {{baseUrl}} stripped and :id parameters kept.
Defaults
| Setting | Default |
|---|---|
| Host | 127.0.0.1 (local only) |
| Port | 4010, or the next free port |
| State after app restart | Stopped until you start it again |
Workflow
- Open Mock Servers, or choose Create Mock Server on a collection in Requests.
- Add or edit routes (method + path).
- Configure responses — status, headers, body and delay. A route can hold several responses; add, duplicate, disable or delete them.
- Start the server and call
http://127.0.0.1:<port>/...from a browser, curl or Shurikly. Test sends a request to the selected route, Copy cURL copies a ready command, and URL copies the server address.
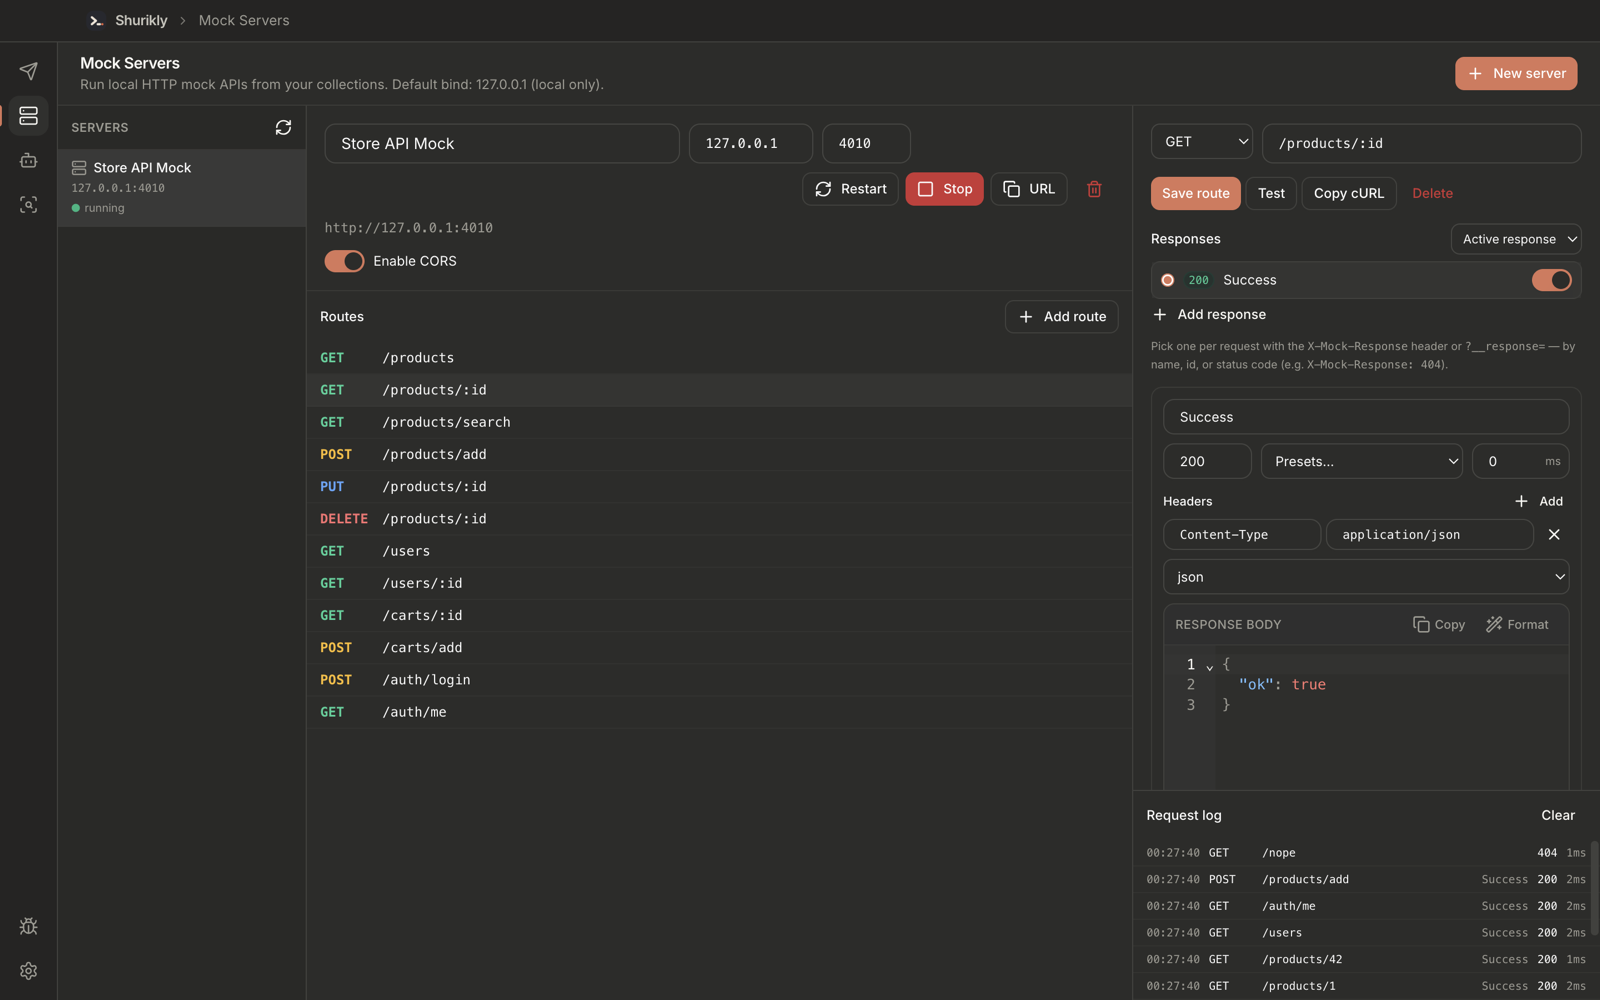 Editing
 GET /products/:id: response name, status, delay, headers and body on the right, and the live Request log below — including a 404 for an unknown path.
The Request log lists every call with time, method, path, the response that was served, status and duration.
Save real responses as examples
In Requests, send a request, open the response menu and choose Save as mock example. Status, headers and body are added to the matching route (or a new route is created). Transport headers such as Content-Length, Set-Cookie and Date are dropped, {{baseUrl}} prefixes are ignored and {{id}} / {id} segments become :id parameters.
Choosing a response
| Mode | Behavior |
|---|---|
| Active (default) | Always serves the response marked active |
| Sequential | Rotates through enabled responses on each request |
| Random | Serves a random enabled response |
A client can choose a response for a single call with the X-Mock-Response header or the __response query parameter, matching the response id, name (case-insensitive) or status code:
curl -H "X-Mock-Response: Not found" http://127.0.0.1:4010/users/1
curl "http://127.0.0.1:4010/users/1?__response=404"
An unknown value returns 400 with the list of available response names. Served responses carry an X-Mock-Response header with the URL-encoded response name.
Route matching
- Paths support
:parameters, e.g.GET /users/:id. - Static segments win over parameters —
/users/mematches before/users/:id. - Query strings are ignored for matching but available in templates.
Templates
| Variable | Meaning |
|---|---|
{{params.id}} | Path parameter |
{{query.page}} | Query parameter |
{{headers.authorization}} | Request header |
{{body.name}} | Field from a JSON request body |
{{method}}, {{path}}, {{host}} | Request metadata |
Missing values render as an empty string. CORS can be enabled per server, and every call is recorded in the request log.
MCP server
Shurikly includes a local Model Context Protocol server so AI agents can work with your live workspace — the same collections, environments and results you see in the app.
Enabling it
- Open Settings → AI and enable the MCP server.
- The server listens on
http://127.0.0.1:47823/mcp(port configurable) and requires a bearer token, which you can regenerate at any time. - By default, secrets are replaced with placeholders before an agent sees them. You can choose to expose them.
Connecting an agent
- Claude Desktop — click Install in Settings. Shurikly adds an
api-studioentry toclaude_desktop_config.jsonwithout touching your other servers. If Shurikly is not running, the stdio bridge can start it. - Claude Code and other HTTP MCP clients:
claude mcp add --transport http --header "Authorization: Bearer <token>" api-studio http://127.0.0.1:47823/mcp
Tools (28)
| Group | Tools |
|---|---|
| Read | list_collections, get_collection, get_request, search_requests, list_environments, list_history, get_active_tab, export_collection, generate_code_snippet |
| Collections & folders | create_collection, update_collection, delete_collection, create_folder, update_folder, delete_folder |
| Requests | create_request, update_request, delete_request, open_request |
| Environments | create_environment, update_environment, delete_environment, set_active_environment |
| Import | import_collection, import_curl |
| Execute | send_request, run_collection |
Diagnostics and bug reports
- Diagnostics page with searchable application logs.
- Global logging of renderer errors and unhandled promise rejections.
- Local bug reports with severity, category, reproduction steps and optional diagnostics.
- Credential redaction on diagnostic attachments.
- Reports stay on your device. Nothing is submitted to an external service automatically; you choose whether to attach a report to a GitHub issue.
Settings
Settings are grouped into four tabs:
| Tab | Contents |
|---|---|
| Account | Local profile and activity (no online account) |
| Workspace | Request, editor and general application preferences |
| AI | Providers and keys, routing, budget, privacy switches, MCP server |
| Help | About, version, diagnostics and links |
Settings are stored as JSON and can be backed up by copying the data folder.
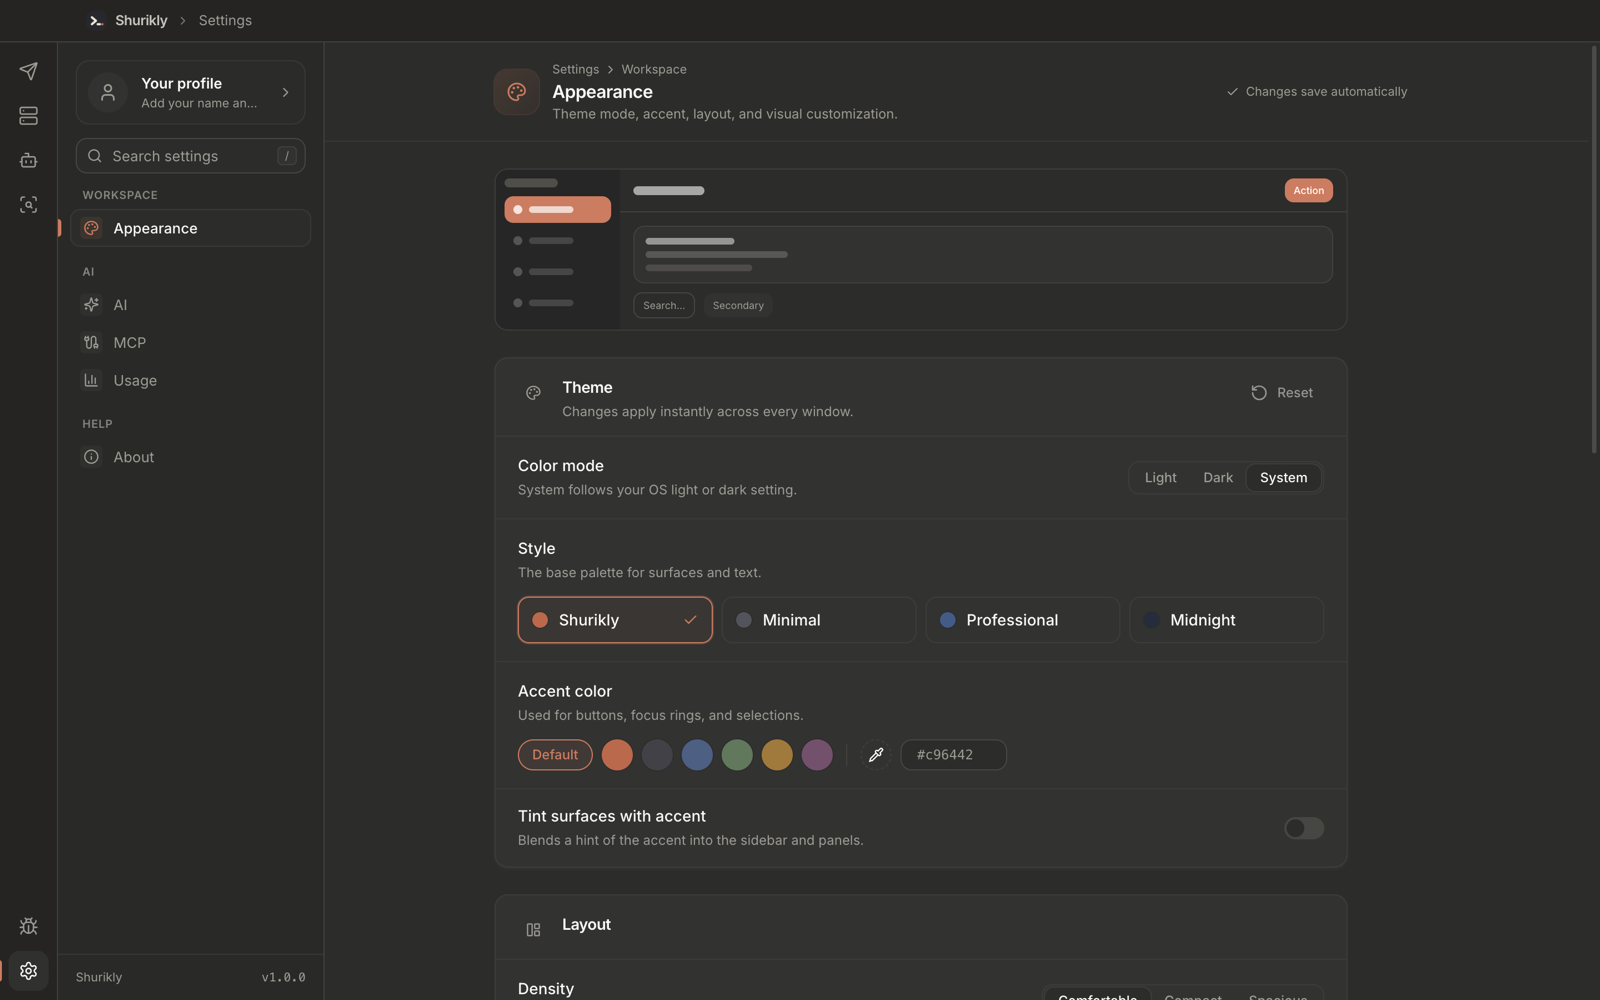 Settings → Appearance: color mode (Light, Dark, System), style (Shurikly, Minimal, Professional, Midnight), accent color and density.
 The same workspace in Light mode.
Privacy and security
| Topic | Behavior |
|---|---|
| Accounts | None. Shurikly never asks you to sign in. |
| Telemetry | None. |
| Request traffic | Sent directly from your machine to the server you call. |
| Storage | Plain JSON files in the local app data folder. |
| API keys | Encrypted with the OS secure storage via Electron safeStorage (Keychain on macOS, DPAPI on Windows). |
| AI data sharing | Off by default in AI Engineer; per-run consent in Code Scanner; secrets redacted before any AI call. |
| Mock Server | Binds to 127.0.0.1 by default. |
| MCP Server | Off by default; binds to 127.0.0.1; bearer-token protected; host header checked; secrets hidden unless exposed. |
| Diagnostics | Credentials redacted; reports never auto-uploaded. |
Reporting a vulnerability
Please report security issues privately through GitHub Security Advisories on the repository rather than in a public issue.
Data storage
Shurikly stores its data in the data subfolder of the shurikly folder inside the operating system's application data directory:
| OS | Location |
|---|---|
| macOS | ~/Library/Application Support/shurikly/data/ |
| Windows | %APPDATA%\shurikly\data\ |
| Linux | ~/.config/shurikly/data/ |
| File | Contents |
|---|---|
workspace.json | Collections, folders, requests, environments, history |
settings.json | Application settings |
ai-provider-config.json | AI provider configuration (keys encrypted) |
usage.json | Local AI usage and cost tracking |
ai-engineer.json | Analyses, test suites, runs, findings, privacy settings |
mock-servers.json | Mock server definitions |
mcp-server.json | MCP server port, token and options |
profile.json, activity.json | Local profile and activity |
onboarding.json | First-run state |
To back up or move Shurikly to another computer, copy the shurikly folder while the app is closed. Encrypted API keys are tied to the original machine and must be entered again.
Architecture
Tech stack
| Layer | Technology |
|---|---|
| Shell | Electron 41 |
| UI | React 19, TypeScript 5, TailwindCSS, Radix UI, Framer Motion |
| State | Zustand |
| Editors | CodeMirror 6 (JSON, GraphQL and more) |
| Build | Vite via electron-vite, electron-builder |
| AI | OpenAI SDK and provider adapters, Model Context Protocol SDK |
| Tests | Vitest (28 test suites) |
Process model
- Main process — HTTP engine, auth and OAuth 2.0, script and test runners, AI providers and router, Code Scanner, AI Engineer, Mock Server runtime, MCP server, logging and JSON storage.
- Preload — a
contextBridgeAPI exposing a typed IPC surface. - Renderer — the React UI. It never makes network calls directly; everything goes through typed IPC defined in
shared/ipc/api.ts.
Repository layout
electron/
  main/
    api-studio/    HTTP client, auth, OAuth 2.0, scripts/tests, AI helpers
    ai/            AI providers, routing, metrics, budget guard
    ai-engineer/   analysis, test generation, execution
    code-scanner/  folder scanning and AI enrichment
    infra/         logger, API keys, onboarding, bug reports, JSON store
    ipc/           IPC handlers
    mock-server/   local HTTP mock server runtime
    mcp/           local MCP server and stdio bridge
    windows/       main window
  preload/         contextBridge API
src/
  modules/         api-studio · code-scanner · ai-engineer · mock-server
  features/        settings, onboarding, diagnostics
  shared/          UI components, stores, utilities
shared/            cross-process types, IPC contract, pure libraries
tests/             vitest suites
System requirements
| Minimum | |
|---|---|
| macOS | macOS 12 Monterey or later; Apple silicon (arm64) or Intel (x64) |
| Windows | Windows 10 or 11, 64-bit (x64) |
| Linux | 64-bit distribution able to run AppImage (glibc-based) |
| Memory | 4 GB RAM (8 GB recommended for large collections and Code Scanner) |
| Disk | About 450 MB for the installed app plus your data (download is about 170 MB) |
| Network | Only for the APIs you call and any cloud AI provider you choose |
| Local AI (optional) | Ollama with a model that fits your hardware |
Build from source
Requirements: Node.js 20+ and Git. The source code is published on GitHub on launch day, 25 October 2026.
git clone https://github.com/shurikly/shurikly.git
cd shurikly
npm install
npm run dev
| Command | Purpose |
|---|---|
npm run dev | Start the app with hot reload |
npm run typecheck | TypeScript checks for main and renderer |
npm test | Run the Vitest suites |
npm run verify | Typecheck, tests and production build |
npm run dist:mac | Build .dmg for macOS |
npm run build:mac | Build .dmg for both Intel and Apple silicon |
npm run dist:win / npm run build:win | Build the Windows NSIS installer (x64) |
npm run dist:linux | Build the Linux AppImage |
Installers are written to release/.
Release artifacts for 1.0.0
| Platform | File |
|---|---|
| macOS Apple silicon | Shurikly-1.0.0-arm64.dmg |
| macOS Intel | Shurikly-1.0.0.dmg |
| Windows x64 | Shurikly Setup 1.0.0.exe |
| Linux x64 | Shurikly-1.0.0.AppImage |
Contributing
Shurikly is built in the open and contributions of every size are welcome.
- Discuss — open an issue for bugs and larger features before starting work.
- Fork and branch — create a topic branch from
main. - Develop — follow the existing code style; run
npm run lintandnpm run format. - Verify —
npm run verifymust pass. Add or update tests intests/. - Pull request — describe what changed and why, with screenshots for UI changes.
Good first areas: new Code Scanner extractors (Spring, Go, Laravel, Rails, Koa, Hono, tRPC), documentation, translations of UI text, and additional code-snippet languages.
Roadmap
Planned after 1.0.0 (subject to community feedback):
- Code Scanner — Spring, Go, Laravel, Rails, Koa, Hono, hapi and tRPC; GraphQL server schemas; multi-folder scans; request preview before import; open-in-editor; persisted scans.
- AI Engineer phase 2 — security scan module, API diff, conversational agent, documentation export.
- Distribution — signed and notarized macOS builds, signed Windows installer, automatic updates, Windows arm64.
- Collaboration — git-friendly per-request files for sharing collections through a repository.
- More — additional code-snippet languages, gRPC support.
Known limitations in 1.0.0
- macOS builds are not notarized and the Windows installer is not code-signed; the operating system shows a warning on first launch.
- No automatic updates yet — download new versions from the website or GitHub Releases.
- Code Scanner frontend wrappers support one URL parameter per wrapper function.
- Code Scanner does not yet follow Fastify
@fastify/autoloaddirectory prefixes (onlyautoPrefixexports), NestJSRouterModulepaths, or Django regex routes with character classes outside named groups. - Data from earlier pre-release app names is not migrated to the
shuriklydata folder. - AI Engineer test runs do not yet substitute environment variables or path parameters, so requests written as
{{baseUrl}}/products/:idfail. Use absolute URLs in the collection you analyze until this is fixed. - Create Mock Server from a collection fails when another mock server already uses port 4010. Change or delete that server's port first.
Troubleshooting
| Problem | Fix |
|---|---|
| macOS: "Shurikly can't be opened" | Right-click the app in Applications → Open → Open. |
| Windows: SmartScreen warning | More info → Run anyway. |
| A request works in the browser but not in Shurikly | Check the active environment and variable values; open the request's resolved URL and headers. |
| Mock Server port in use | Shurikly picks the next free port; check the server card for the actual port. |
| Claude Desktop does not see Shurikly | Enable the MCP server, click Install in Settings, then fully restart Claude Desktop. |
| AI features are unavailable | Add a provider and key in Settings → AI, or install Ollama and pull a model. |
| Something else | Open Bug Reports → Diagnostics, create a report, and attach it to a GitHub issue. |
Changelog
1.0.0 — 2026-10-25
First public, open-source release.
Added
- API client with REST, GraphQL and WebSocket, eleven auth types, and body editors.
- GraphQL introspection, autocomplete, validation and operation selection.
- Response inspection: JSON tree, filter, JSONPath, previews, hex view, find, save.
- Response compare against previous run, pinned baseline or another tab.
- Collections, folders with inheritance, tabs, history, and environments.
- Pre-request scripts, tests and the collection runner with reports.
- Import Postman, OpenAPI and cURL; export Postman, OpenAPI, cURL, Markdown and HTML docs; code snippets.
- Code Scanner for Node.js and Python backends, OpenAPI files and frontend HTTP calls, with re-scan merge, AI enrichment and OpenAPI export.
- AI assistance with OpenAI, Anthropic, Gemini, OpenAI-compatible endpoints and Ollama.
- AI Engineer: analysis, baseline and AI tests, safe execution and failure analysis.
- Mock Server with multiple responses per route, templates, CORS and request logs.
- Local MCP server with 28 tools and one-click Claude Desktop setup.
- Diagnostics center and local bug reports with credential redaction.
- Installers for macOS (Apple silicon and Intel), Windows and Linux.
Changed
- Product renamed to Shurikly, with a new icon and the
shuriklydata folder. - Settings and AI usage stored as JSON files instead of a database.
- Single main window with a slim title bar.
License
Shurikly is released under the MIT License.
MIT License

Copyright (c) 2026 Shurikly contributors

Permission is hereby granted, free of charge, to any person obtaining a copy
of this software and associated documentation files (the "Software"), to deal
in the Software without restriction, including without limitation the rights
to use, copy, modify, merge, publish, distribute, sublicense, and/or sell
copies of the Software, and to permit persons to whom the Software is
furnished to do so, subject to the following conditions:

The above copyright notice and this permission notice shall be included in all
copies or substantial portions of the Software.

THE SOFTWARE IS PROVIDED "AS IS", WITHOUT WARRANTY OF ANY KIND, EXPRESS OR
IMPLIED, INCLUDING BUT NOT LIMITED TO THE WARRANTIES OF MERCHANTABILITY,
FITNESS FOR A PARTICULAR PURPOSE AND NONINFRINGEMENT. IN NO EVENT SHALL THE
AUTHORS OR COPYRIGHT HOLDERS BE LIABLE FOR ANY CLAIM, DAMAGES OR OTHER
LIABILITY, WHETHER IN AN ACTION OF CONTRACT, TORT OR OTHERWISE, ARISING FROM,
OUT OF OR IN CONNECTION WITH THE SOFTWARE OR THE USE OR OTHER DEALINGS IN THE
SOFTWARE.